
Updated 16 October 2023 – Author marten.vosmer@lialis.com
File Jockey for HCL Connections
Connect top mobile business apps like Docs@Work, Goodreader, Notability and many more to the files stored in HCL Connections.
Feature list
- Download, modify and upload HCL Connections files directly to iPad, iPhone and Android by using mobile Apps which support WebDAV.
- Read and write access to My Files, My Folders and Community Files and Folders.
- Versioning and trash bin in IBM Connections are supported.
How it works
- File Jockey supports top mobile business apps with WebDAV capabilities on mobile devices on Apple iOS and Android devices.
- File Jockey is a server-based java program that runs on Java servers like HCL WebSphere, JBoss or Tomcat.
- File Jockey supports read and write operations from the mobile device or the Windows PC to HCL Connections.
File Jockey User Manuals
Lets explain how to setup various apps and programs to interact with the files in IBM Connections via Lialis File Jockey by using the app Goodreader as an example. All other apps work in the same manner as we demonstrate with Goodreader.
iPhone – Goodreader
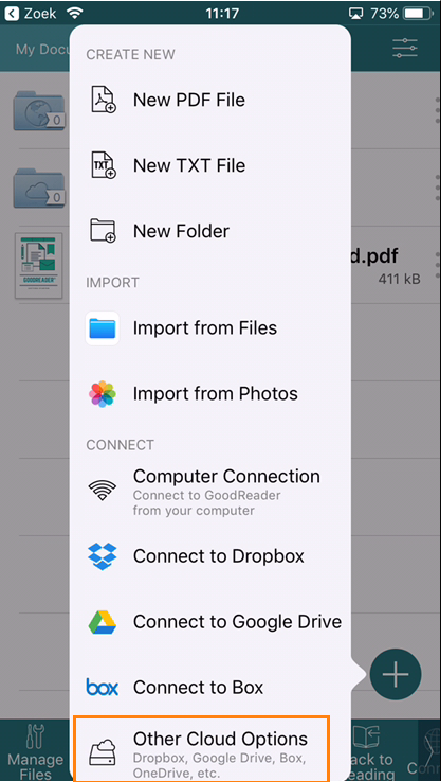
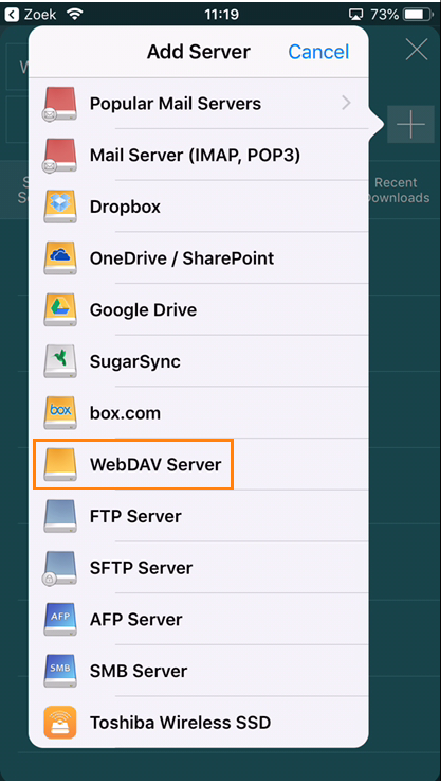
On your iPad, open (or install first) the Goodreader app and press the + button on the right, choose Other Cloud Options and then WebDAV server.
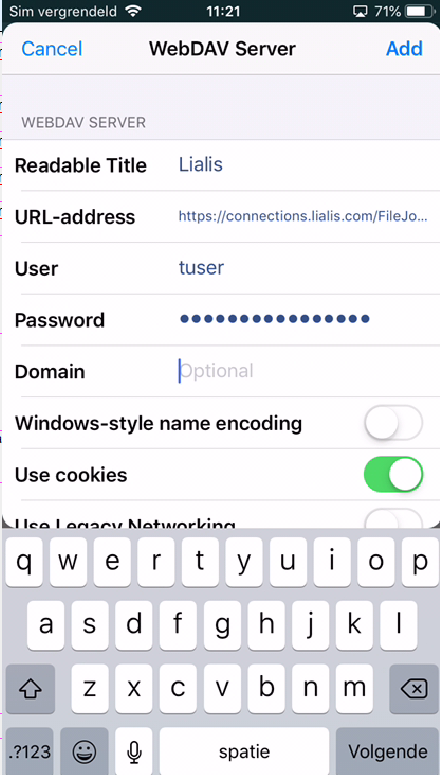
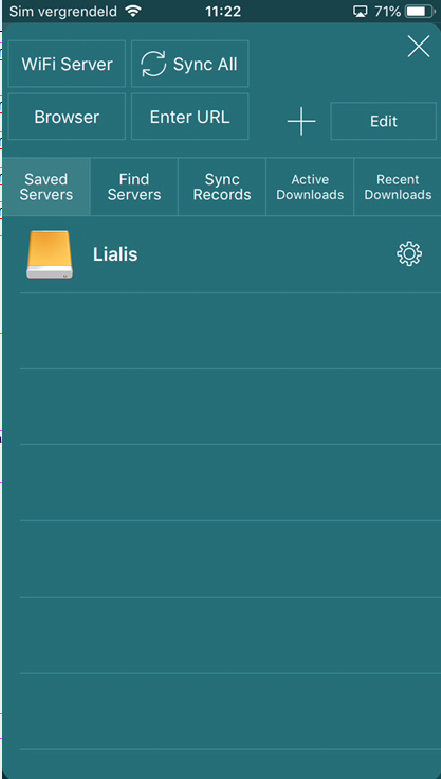
Fill in the File Jockey for HCL Connections URL and the credentials. Your Goodreader will show the new server connection Lialis to IBM Connections.
When you press the connection the Goodreader will show all the files and folders listed in your IBM Connectio9ns environment.
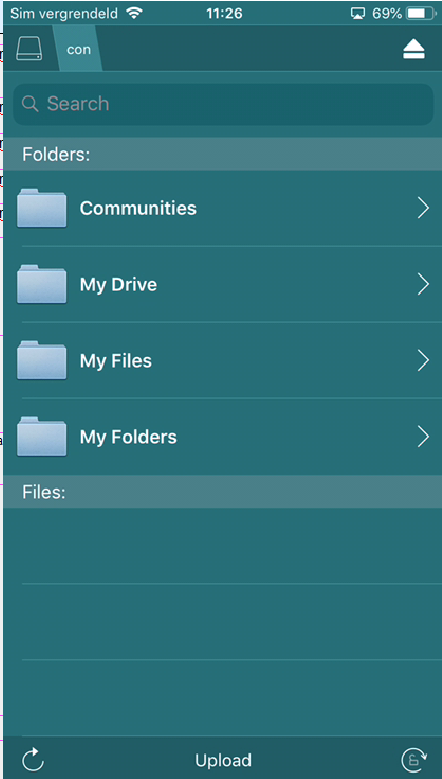
In this example we will select the Lialis community in order to sync all Lialis Community’s files to the iPhone for offline usage.
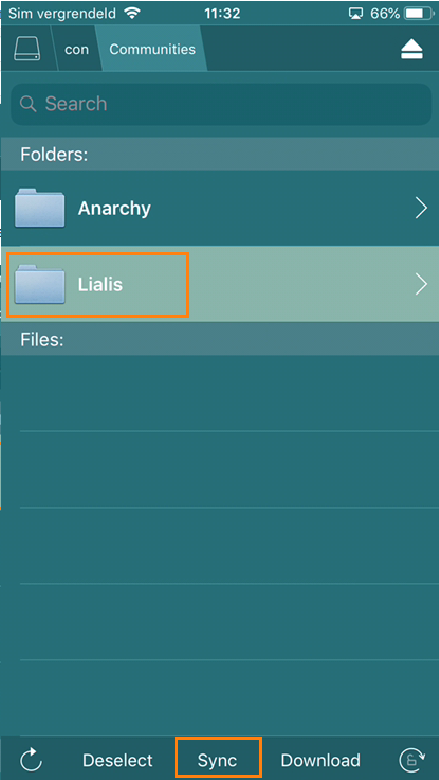
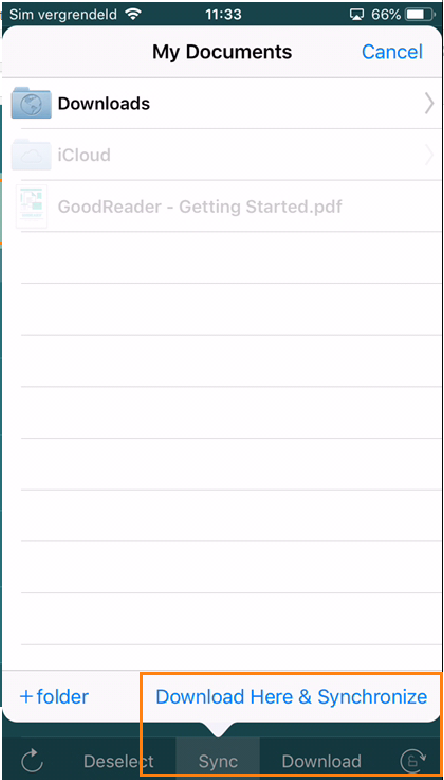
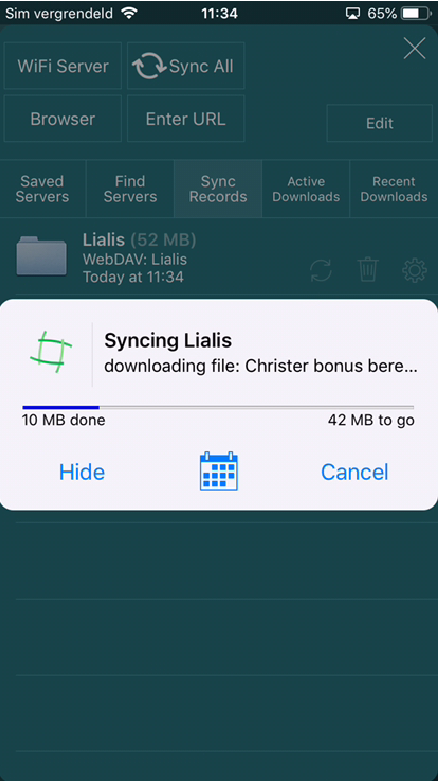
When the Goodreader completes the sync you will see the Remote sync option to the Lialis community in Connections.
Every time you push the sync option Goodreader will download or upload new documents from and to HCL Connections. Isn’t this great?

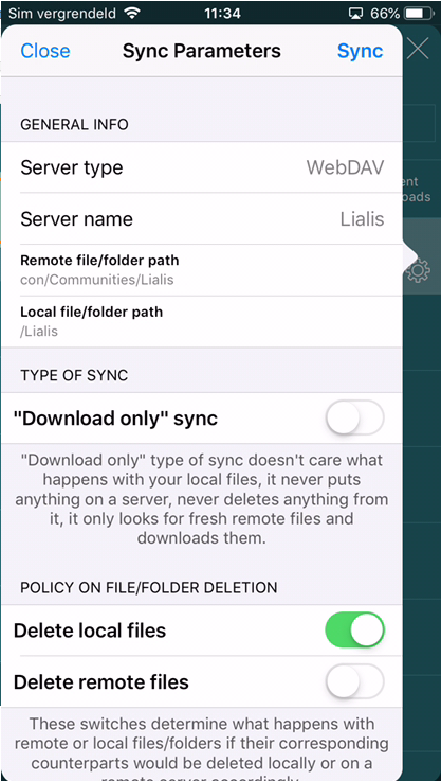
You may add more sync’s to the Goodreader, for example sync the My Files or a particular file in a community.
All other apps work in the same manner as we explained for Goodreader and Docs@Work.
File Jockey installation guide on HCL WebSphere
Installation guide to install File Jockey on HCL WebSphere for HCL Connections.
File Jockey v 2 supports HCL Connections version 5, 6 and 7 and IBM/HCL WebSphere 8.5 and higher.
File Jockey supports all operating systems where HCL WebSphere can be installed on.
File Jockey may also be installed on Apache Tomcat server (not documented yet). Installing File Jockey on JBoss / WildFly is not supported and will give problems.
If you have problems or questions please email us on support@lialis.com.
Installation approach
In this guide we will install File Jockey on a single WebSphere Application Server. File Jockey may also be installed on a clustered WAS setup only if the nodes are located of different servers from (virtual) hardware point of view. If you install File Jockey on a WAS cluster you need to carry out some manual xml file tweaking because of a limitation in the File Jockey administration interface.
Creating and configuring a dedicated WebSphere application server for File Jockey
Register a new WebSphere application server.
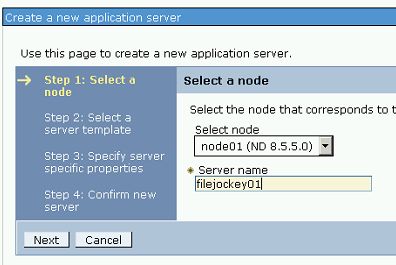
Choose default template, generate unique ports, choose confirm and save to create the new server.
Navigate to the Web servers (IHS), select the IHS server and choose Generate Plug-in
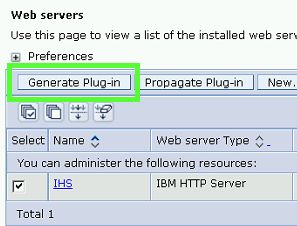
Then choose Propagate Plug-in. This will tell the IHS server there is a new WebSphere application server it has to serve.
Final step is to reboot the IHS server.
Installing File Jockey on single WebSphere application server located on one node.
In this installation guide File Jockey v2 will be installed on a single WebSphere application server.
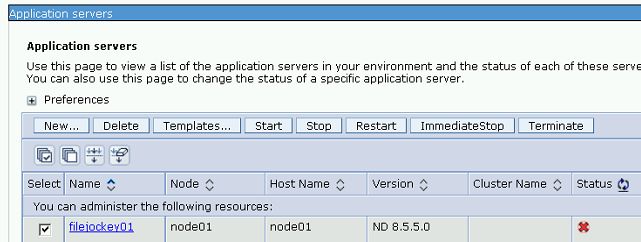
HCL Connections runs on a different server.
Installation steps
Deploy the File Jockey WAR file.
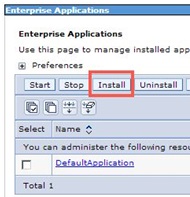
Go to the ‘Enterprise applications’ section and press the ‘Install’ button:
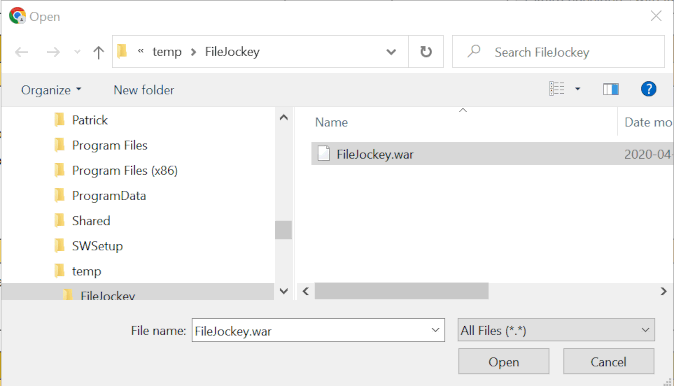
Select the WAR file:
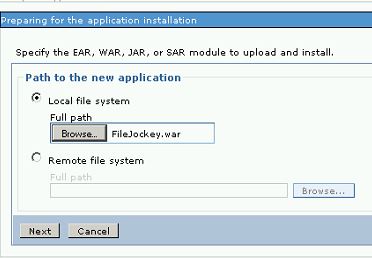
Press ‘Next’.
You can install the application via the Fast Path method.
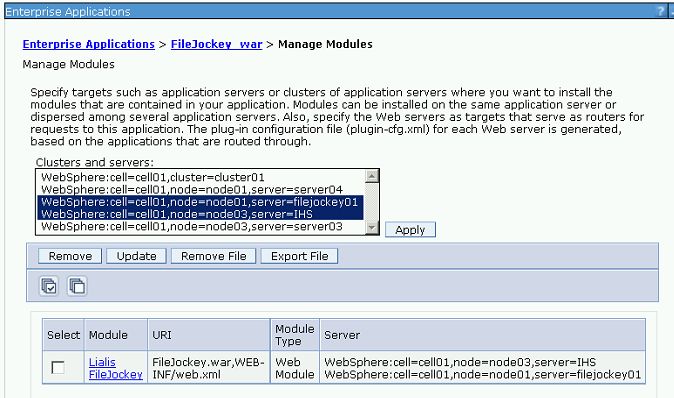
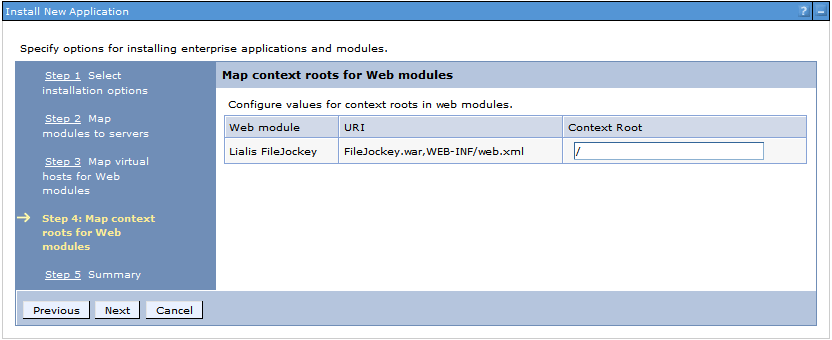
Map the filejockey01 server and the IHS server to the File Jockey application.
Default settings at step 3 Map Virtual Hosts
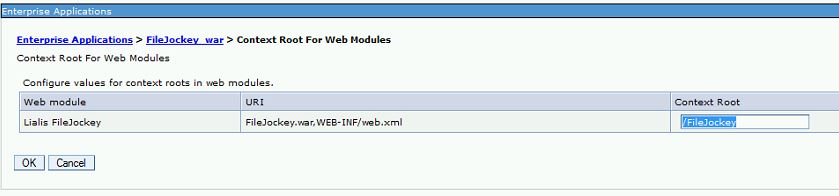
The context root should be /FileJockey (case sensitive)
Make sure the application is installed successfully and save directly to the master configuration.
File Jockey Security
I assume you have configured LDAP within HCL WebSphere and application security has been enabled in the Global Security.
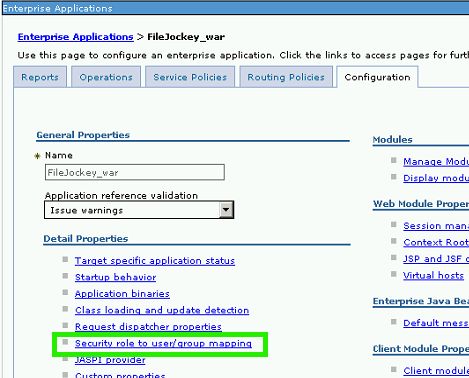
Next step is to configure the File Jockey Security rights. Press the ‘FileJockey_war’ link, then the link ‘Security role to user/group mappings’
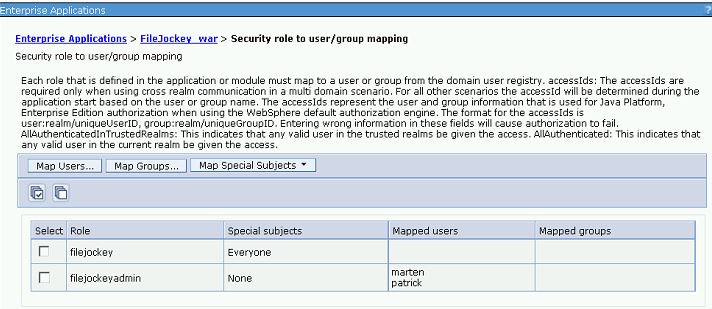
In this example everybody will be authorized to use File Jockey, but feel free to assign groups or users instead.
And the File Jockey admin page will be authorized for two Admins only
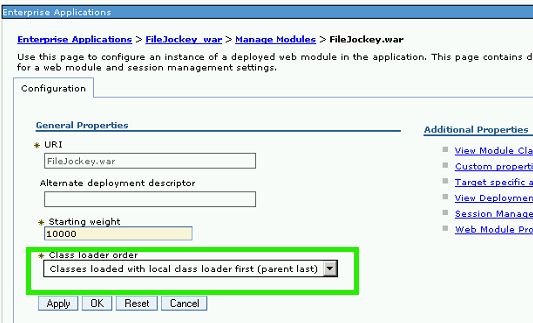
Change the class loader as illustrated below (choose the right class loader!)
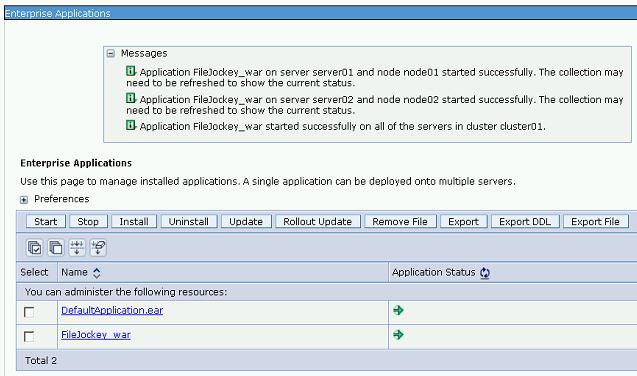
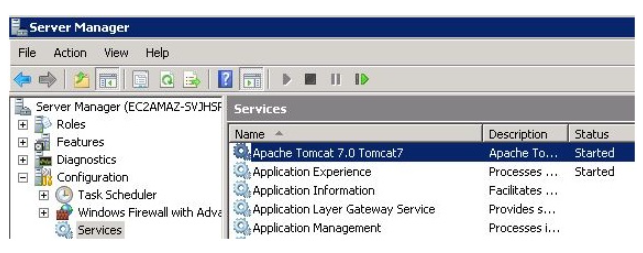
Now you should be able to start the File Jockey application on WebSphere as illustrated below (if you did not forget to start the WAS).
Configure File Jockey
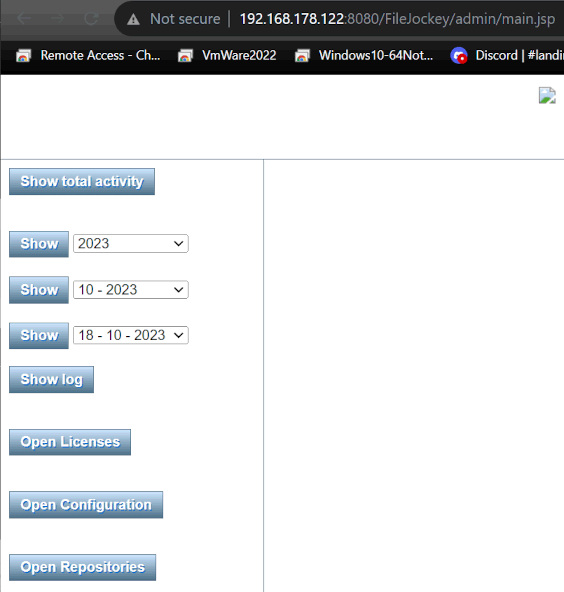
You can access the File Jockey administration page using the URL http(s)://servername/FileJockey/admin/main.jsp (case sensitive) and you should see below screen. Tip, use another browser to access this administration page so you avoid credential problems because you may have already opened the WAS admin console with different credentials which will be passed by the browser to the File Jockey administration page.
Please press the Open Configuration button.
For a minimal setup you must enter the following settings.
- License key (you will have received this key form Lialis). This key is based on the servers computer name
- HTTP Cache folder, here File Jockey will store its cache
- HTTP Threads
- HTTP Cache time
- Log path
For example:
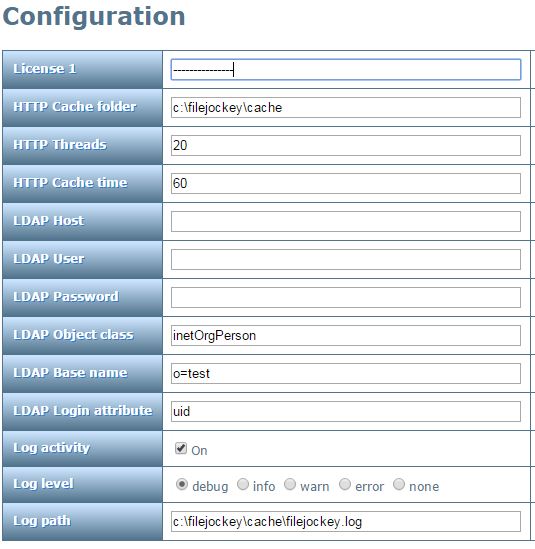
When all is set save the Configuration and reboot the File Jockey was application.
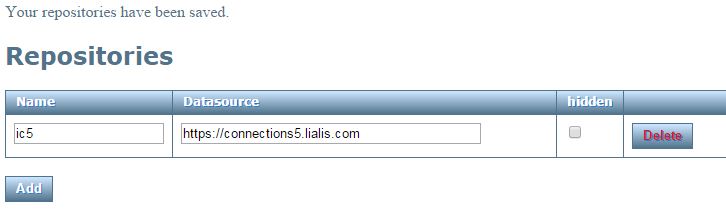
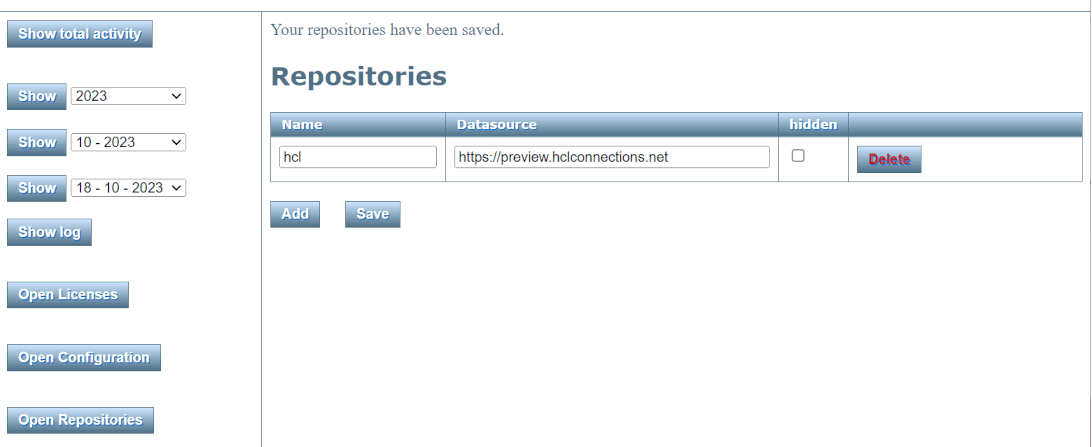
Please press the Open Repository button.
You will find a few example repositories, feel free to remove them. Make sure there is one repository linking to your HCL Connections environment. Advice, keep the name sort because it will be used in the URL accessing File Jockey. When set save the Repositories and reboot the File Jockey was application.
Please press the button Show Log and check the File Jockey log for errors (if the File Jockey log is empty it did not start properly and you should check the SystemOut.log for errors. Below the SystemOut.log how it should look like when there are no error’s.
[fusion_builder_container hundred_percent=”yes” overflow=”visible”][fusion_builder_row][fusion_builder_column type=”1_1″ background_position=”left top” background_color=”” border_size=”” border_color=”” border_style=”solid” spacing=”yes” background_image=”” background_repeat=”no-repeat” padding=”” margin_top=”0px” margin_bottom=”0px” class=”” id=”” animation_type=”” animation_speed=”0.3″ animation_direction=”left” hide_on_mobile=”no” center_content=”no” min_height=”none”][9/22/15 18:39:14:942 UTC] 00000080 SystemOut O Initializing FileJockey version: 2.0.0
[9/22/15 18:39:14:942 UTC] 00000080 SystemOut O Reading configuration
[9/22/15 18:39:14:942 UTC] 00000080 SystemOut O Using configuration file
[9/22/15 18:39:14:957 UTC] 00000080 SystemOut O Loading configuration
[9/22/15 18:39:14:988 UTC] 00000080 SystemOut O Loggers initialized to level: debug
[9/22/15 18:39:14:988 UTC] 00000080 SystemOut O Starting file userlogging.
[9/22/15 18:39:15:113 UTC] 00000080 SystemOut O FileJockey started
[9/22/15 18:39:15:113 UTC] 00000080 ServletWrappe I com.ibm.ws.webcontainer.servlet.ServletWrapper init SRVE0242I: [FileJockey_war] [/FileJockey] [FileJockeyServlet]: Initialization successful.
[9/22/15 18:39:15:113 UTC] 00000080 webcontainer I com.ibm.ws.webcontainer.VirtualHostImpl addWebApplication SRVE0250I: Web Module Lialis FileJockey has been bound to default_host[*:9080,*:80,*:9443,*:5060,*:5061,*:443,10.146.163.173:9080,10.146.163.173:80,10.146.163.173:9443,10.146.163.173:5060,10.146.163.173:5061,10.146.163.173:443,*:9081,*:9082].
[9/22/15 18:39:15:144 UTC] 00000080 ApplicationMg A WSVR0221I: Application started: FileJockey_war
The File Jockey configuration files displayed in the File Jockey Administration page are stored in the Users folder, for example C:UsersAdministrator.FileJockey
WAS Cluster
If you have installed File Jockey on a WAS cluster you will notice that on one of the WAS servers the File Jockey app will complain about an invalid license key. You have to make sure each server is equipped with the right File Jockey license key which is based on the computer name. The best approach is to manual copy below 3 xml files from the WAS server without the license error to the WAS server with the license error. The edit the configuration.xml and add the correct license key you have received from Lialis.
File Jockey URL for WebDAV clients
The URL to access the files stored in HCL Connections is http(s)://serverhostname/FileJockey/root/
This URL can be used on mobile devices, Mac and Windows computers, Please note that Windows 7 computers might need some more attention with regards to Windows patches and security settings.
Changing the File Jockey URL
To change the File Jockey path first you need to open the FileJockey.war file with a zip program. And edit the web.xml file that’s located in the WEB-INF folder.
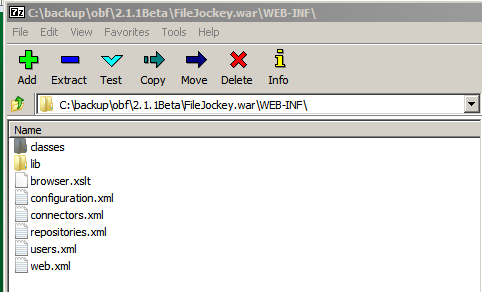
The web.xml file contains 2 xml sections that need to be updated. There is the servlet-mapping section with url-pattern tag. By default it will be set to /root/*. This part tells the server what URLs are linked to the File Jockey servlet classes. Changing this to /rt/* will change the File Jockey URL to: http(s)://serverhostname/FileJockey/rt/
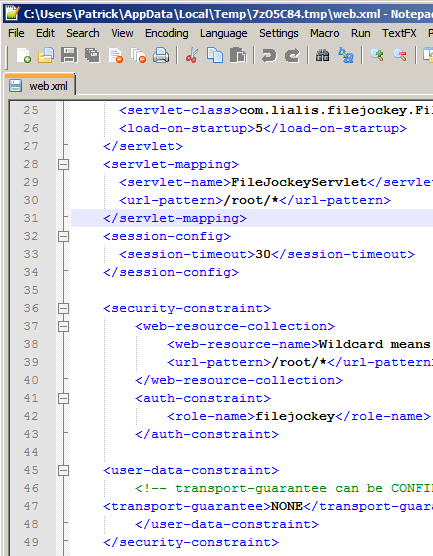
There’s also the security-constraint section with the same url-pattern tag. The value in this tag must be set to the same value as the url-pattern tag in the servlet-mapping section. This section determines the role users need to have before they can make use of File Jockey. If it is not set correctly everybody will have access to File Jockey.
When you’re done, don’t forget to update the web.xml file in the FileJockey.war file.
Next we’ll change the /FileJockey/ part of the URL, which is quite simple. During installation of the FileJockey.war file you’re asked to map the context root for the web modules. As described above, this should normally be set to /FileJockey. But you’re free to set it to anything you like. For example setting this to /fj will result in a File Jockey URL like this: http(s)://serverhostname/fj/rt/
Self signed certificates
When your Connections server uses self signed certificates FileJockey will be unable to reach the Connections API the following chapter will explain how to fix the problem.
Adding a self-signed ssl certificate to the Java truststore
After installing you may find that FileJockey still fails to connect to the Connections API and the following error appears in the FileJockey log: “PKIX path building failed: java.security.cert.CertPathBuilderException: unable to find valid certification path to requested target”. This happens because FileJockey in unable to recognize the ssl certificate of the Connections server, this can happen when the server uses a self-signed certificate or the signer of the certificate is unknown by the Java virtual machine. To make it work the certificate should be added to the Java truststore using the procedure below.
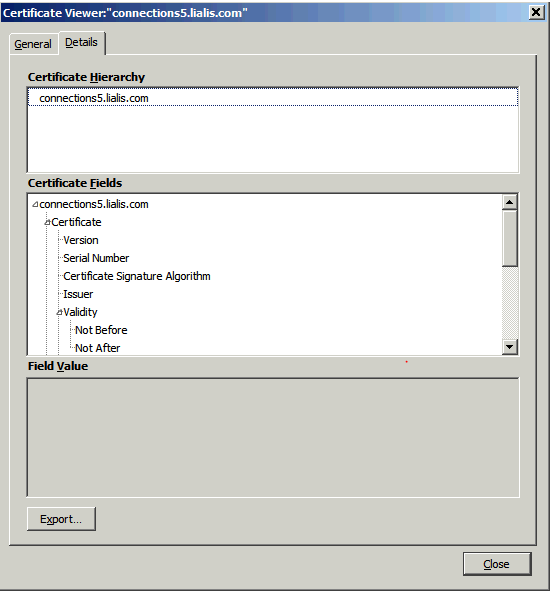
The first step is to get a copy of the certificate public key, the easiest way to get access is to open the connections website in Firefox.
Next click the lock icon in the address bar, a popup will appear with the site address with an > to the right. Click the > and then the “More Information” button at the bottom. In the following Dialog select the Security tab and click the “View Certificate” button.

In the next Dialog go to the Details tab and click the export button. Export the public key of the certificate to disk.
Copy the exported .pem file to your WebSphere server to be imported in the truststore.
Open a Command Prompt on the WebSphere server and navigate to the jvm installation in the WebSphere installation directory. You need to go into the libsecurity folders within this folder.
%WEBSPHERE_ROOT%AppServerjavajrelibsecurity
Use the following command to add the certificate to the trust store:
././bin/keytool -importcert -keystore cacerts -storetype jks -file <path to your .pem datafile> -alias <any unique name>
You’ll be asked for a store password. The default password for the store is “changeit”
The application server needs to be restarted after the procedure for the jvm to pick up the certificate from the truststore.
File Jockey installation guide on Apache Tomcat
This document contains a detailed installation guide of how to install File Jockey on a Windows Apache Tomcat server for IBM Lotus Quickr, IBM Lotus Quickr for Portal or IBM Connections. This guide is based on File Jockey version 1.5.0.
Detailed installation guide
In this guide you must adjust xml files, to avoid XML editing errors we advice to install Notepad++ and use this editor.
Prerequisites
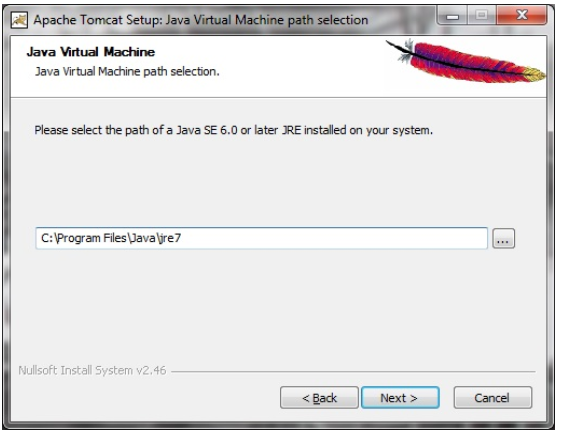
Make sure a JVM is installed. Download Oracle’s latest JVM version at: http://java.com/en/ and install it.
Supported features for
IBM Connections
IBM Lotus Quickr
Installation steps
In this guide we are going to install and configure File Jockey on a Windows 2008 R2 server. Feel free to use the OS of your choice.
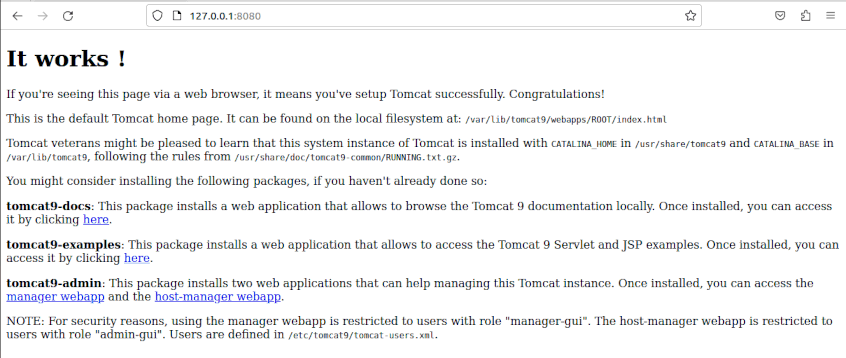
Download latest Apache server version from here http://tomcat.apache.org/. In this guide we use Apache version 7041 for Windows 64 Bits (32-bit/64-bit Windows Service Installer). Run the downloaded file apache-tomcat-7.0.41.exe.
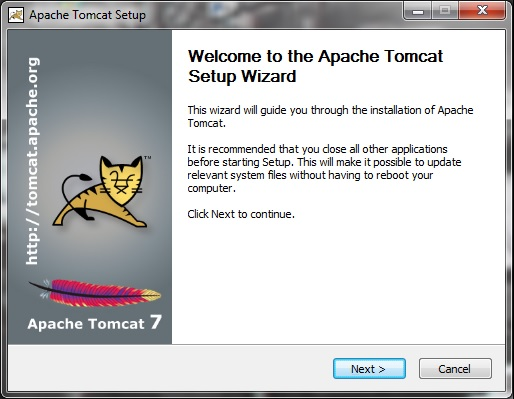
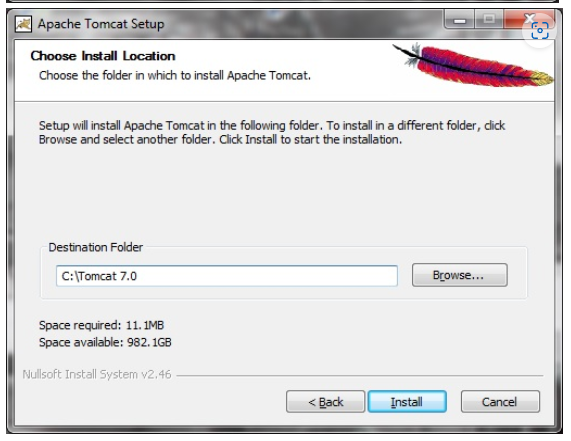
Install is complete, let’s run Apache Tomcat server
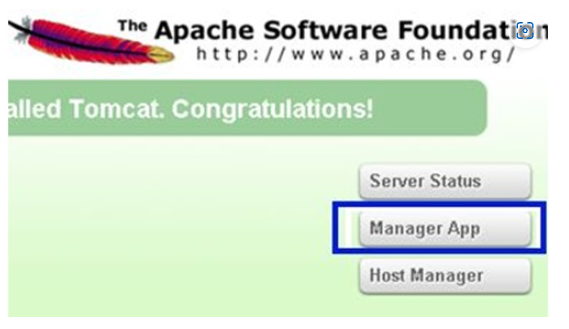
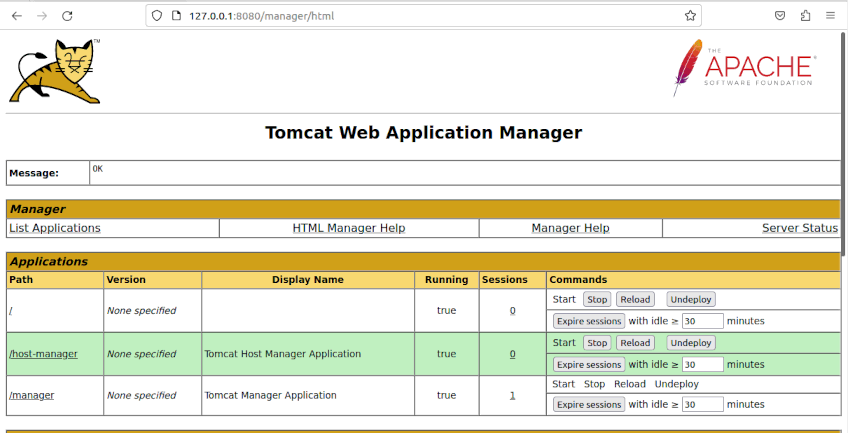
Log on to the Tomcat Web Application Manager and install the File Jockey WAR file. Go to http://localhost:8080/ on the server running Apache and press the Button Manager app.
Deploy the File Jockey WAR file as illustrated below.
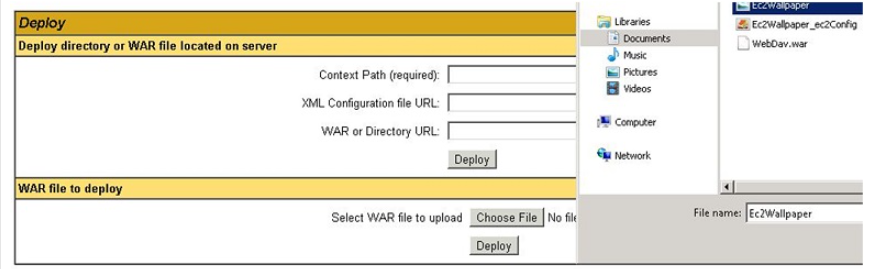
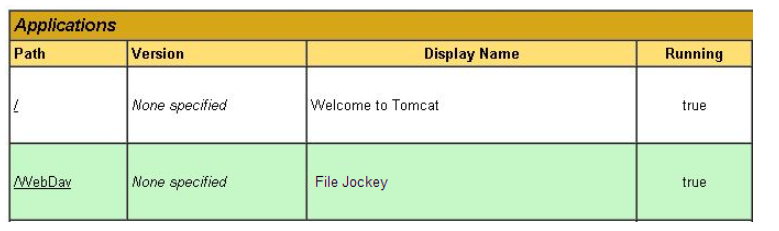
Press the button ‘deploy’ to deploy the WAR file. Now /WebDAV will be displayed under the Applications of the Apache Tomcat server.
The configuration files of File Jockey WebDAV are listed in the folder C:Tomcat 7.0webappsWebDavWEB-INF on the server running File Jockey.
Note these configuration files will be overwritten when a new version is deployed, so make a backup of these files when configured.
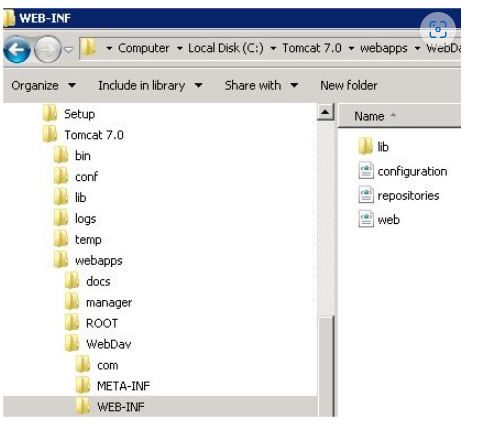
Let’s set these configuration files.
configuration.xml is used to Configure the File Jockey WebDAV server, for example the cache, LDAP and logging settings.
If this file holds <!Doctype stuff like illustrated below please remove it.
Directly after your download of File Jockey for Tomcat Lialis will email you a license key based on the Computer name of the server on which you have installed File Jockey for Tomcat. Please enter the license code like this.
<license>1111-2222-3333-4444-5555-6666-7777-8888-9999-1234-1234</license>
configuration.xml HTTP part
<cachefolder>c:/cache</cachefolder> Folder where the server will temporarily store files, please always use the / sign instead of the sign in file and folder naming
<threads>200</threads> The number of http threads for requesting information from remote servers
<cachetime>60</cachetime> Time in minutes after which files will be removed from the cache folder
configuration.xml LDAP part
This part is not used at this moment in File Jockey version 1.5.0.
configuration.xml Logging part
<activitylogging>true</activitylogging> Boolean, whether user activity will be logged. If set to true the users log will be webdav_users.log stored in the folder set here in logpath.
<level>info</level> Loglevel (trace, debug, info, warn, error, none)
<logpath>C:Tomcat 7.0logswebdav.log</logpath> Folder where the server will store log files, please always use the / sign instead of the sign in file and folder naming
Open repositories.xml file in the text editor, here you must set the Connections or Quickr server URL.
If this file holds <!Doctype stuff like illustrated below please remove it.
We have listed a few examples in the repositories.xml file. Here is an example.
<?xml version=”1.0″ encoding=”UTF-8″?>
<repositories>
<repository>
<general>
<name>greenc</name>
<type>connections</type> <!– connections, quickr –>
<datasource>https://greenhouse.lotus.com</datasource>
<maxupload>100000</maxupload> <!– kB –>
<writeenabled>true</writeenabled>
</general>
<acl>
<allowed>
<placename></placename>
</allowed>
<denied>
<placename></placename>
</denied>
</acl>
</repository>
</repositories>
The repository name is greenc, it’s an IBM Connections server at the URL https://greenhouse.lotus.com with a max upload of 10 MB and people are allowed to write to IBM Connections from the mobile device point of view.
Make sure you do not have double repository names in this xml file.
Next step is to allow the user access in Tomcat. There are three approaches for this.
1. Add the users to the tomcat-users.xml
2. Setup the Tomcat server with LDAP repository to authenticate the users via a LDAP repository
3 Allow any user to use the Tomcat WebDAV server
1. Add the users to the tomcat-users.xml, edit to the file tomcat-users.xml located in the directory C:Tomcat 7.0conf
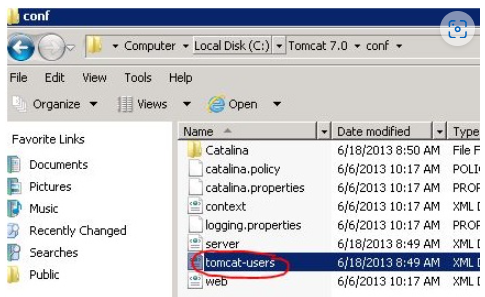
At the bottom of this file we must add the role webdav like this
<role rolename=”webdav”/>
Set the users who are going to use File Jockey WebDAV with for example IBM Connections, so you must add the IBM Connections user accounts to the tomcat-users.xml file and you must define the role to be webdav, like this
<user username=”marten@lialis.com” password=”abcde” roles=”webdav”/>
<user username=”chris.crum@lialis.com” password=”abcde” roles=”webdav”/>
Here is how the bottom of this file should look like and two users have been configured (you must enter the correct passwords in this file). Don’t delete the user with the role manager-gui.
<!–
NOTE: The sample user and role entries below are wrapped in a comment
and thus are ignored when reading this file. Do not forget to remove
<!.. ..> that surrounds them.
–>
<role rolename=”tomcat”/>
<role rolename=”role1″/>
<role rolename=”webdav”/>
<user name=”admin” password=”abcde” roles=”manager-gui” />
<user username=”marten@lialis.com” password=”abcde” roles=”webdav”/>
<user username=”chris.crum@lialis.com” password=”abcde” roles=”webdav”/>
</tomcat-users>
In the folder C:Tomcat 7.0webappsWebDavWEB-INF edit web.xml and add the role webdav to this file at two locations in this file.
<security-constraint>
<web-resource-collection>
<web-resource-name>Wildcard means whole app requires authentication</web-resource-name>
<url-pattern>/*</url-pattern>
</web-resource-collection>
<auth-constraint>
<role-name>webdav</role-name> “here you must adjust tomcat into webdav, do not add this line between “” to the web.xml file”
</auth-constraint>
At the bottom of web.xml
<security-role>
<role-name>webdav</role-name> “here you must adjust tomcat into webdav, do not add this line between “” to the web.xml file”
</security-role>
Save and close web.xml
2. Setup the Tomcat server with LDAP
In the folder C:Tomcat 7.0conf and edit the server.xml file. Add these settings below <Engine name=”Catalina” defaultHost=”localhost”>.
<Realm className=”org.apache.catalina.realm.CombinedRealm” >
<Realm className=”org.apache.catalina.realm.UserDatabaseRealm”
resourceName=”UserDatabase”/>
<Realm className=”org.apache.catalina.realm.JNDIRealm”
connectionURL=”ldap://app1.lialis.com:389″
connectionName=”cn=lialis,o=lialis”
connectionPassword=”password”
userBase=”o=lialis”
userSearch=”(uid={0})”
roleName=”cn”
roleBase=””
roleNested=”true”
roleSearch=”(member={0})”
roleSubtree=”true”
/>
</Realm>
Like this
Now you must define a group in your LDAP directory to look-up the users who are allowed to do File Jockey WebDAV via this Tomcat server.
In the folder C:Tomcat 7.0webappsWebDavWEB-INF edit web.xml and add the a LDAP group name to this file at two locations where the role is mentioned: <role-name>lialis</role-name>. In this example the group name is lialis.
If you do not want to use a group and you want to allow any user who is listed in the LDAP to use the Tomcat WebDAV server please remove the information listed below from the web.xml file.
<security-constraint>
<web-resource-collection>
<web-resource-name>Wildcard means whole app requires authentication</web-resource-name>
<url-pattern>/*</url-pattern>
</web-resource-collection>
<auth-constraint>
<role-name>webdav</role-name>
</auth-constraint>
<user-data-constraint>
<!– transport-guarantee can be CONFIDENTIAL, INTEGRAL, or NONE –>
<transport-guarantee>NONE</transport-guarantee>
</user-data-constraint>
</security-constraint>
<login-config>
<auth-method>BASIC</auth-method>
</login-config>
<security-role>
<role-name>webdav</role-name>
</security-role>
If this does not work for you, you might need more debug information. Edit the C:tomcatconflogging.properties file and add this
###########################################################
# Facility specific properties.
# Provides extra control for each logger.
############################################################
org.apache.catalina.realm.level = ALL
org.apache.catalina.realm.useParentHandlers = true
org.apache.catalina.authenticator.level = ALL
org.apache.catalina.authenticator.useParentHandlers = true
Save and restart Tomcat server.
3. Allow any user to use the Tomcat WebDAV server
You may choose to configure your Tomcat WebDAV server to not check the user names. In this case the Tomcat server will allow any user to pass thru to the IBM Connections of Quickr server which will do the final authentication. To do so please remove the information listed below from the web.xml file.
<security-constraint>
<web-resource-collection>
<web-resource-name>Wildcard means whole app requires authentication</web-resource-name>
<url-pattern>/*</url-pattern>
</web-resource-collection>
<auth-constraint>
<role-name>webdav</role-name>
</auth-constraint>
<user-data-constraint>
<!– transport-guarantee can be CONFIDENTIAL, INTEGRAL, or NONE –>
<transport-guarantee>NONE</transport-guarantee>
</user-data-constraint>
</security-constraint>
<login-config>
<auth-method>BASIC</auth-method>
</login-config>
<security-role>
<role-name>webdav</role-name>
</security-role>
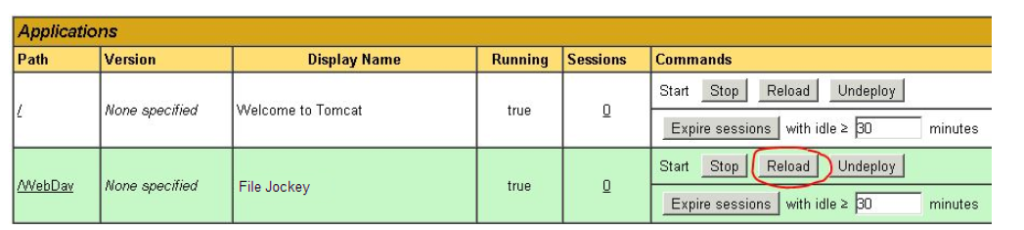
Reload File Jockey WebDAV by pressing the Reload button as illustrated below or restart the Apache Tomcat service/server via the services.
Let’s check the File Jockey WebDAV log, these are located in the folder C:Tomcat 7.0logs and has the file name webdav.log
09:54:59.8 [INFO] WebDav: WebDav version: 1.5.0_321
09:54:59.8 [TRACE] WebDav: Checking license
09:54:59.8 [DEBUG] x: Number of active loggers: 10
09:54:59.8 [DEBUG] aq: Number of active loggers: 11
09:54:59.8 [DEBUG] aq: Setting log time: 60
09:54:59.8 [DEBUG] aq: Cache size: 0
09:54:59.8 [DEBUG] be: Number of active loggers: 12
09:54:59.8 [DEBUG] aq: Cache size: 0
09:54:59.8 [DEBUG] aq: Setting cache folder: temp
09:54:59.8 [DEBUG] bf: Number of active loggers: 13
09:54:59.8 [TRACE] be: Cache maintenance started
09:54:59.8 [DEBUG] aq: Cache size: 0
09:55:00.1 [TRACE] bf: Thread started
Now it’s time to test File Jockey.
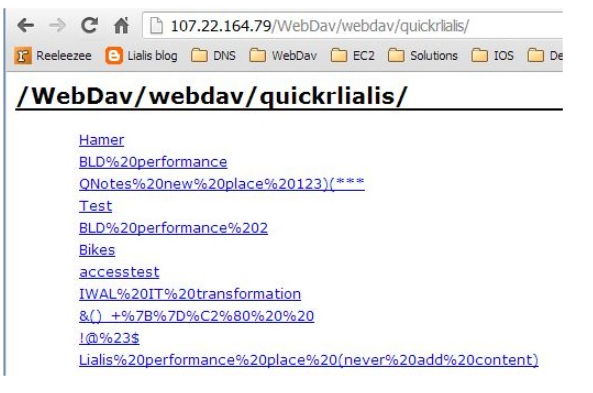
The File Jockey WebDAV server URL is http://localhost:8080/WebDav/webdav/greenc where greenc is the name of the repository set in the Open repositories.xml file. Important, this URL is case sensitive.
You can do a quick test with the browser like this (make sure you view the source and the result should look as illustrated below).
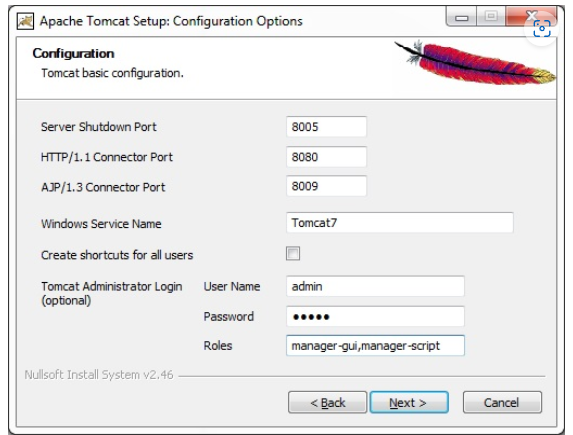
Tomcat runs default on port 8080, you can adjust this to port 80 by modifying the C:Tomcat 7.0confserver.xml file as illustrated below.
–>
<Connector port=”80″ protocol=”HTTP/1.1″
connectionTimeout=”20000″
redirectPort=”8443″ />
<!– A “Connector” using the shared thread pool–>
Save the file and stop and start windows service Apache Tomcat 7.0 Tomcat 7
When the Tomcat server running File Jockey is reachable from the intranet/internet you may now use any WebDAV client (Bitkinex or Goodreader) to access the IBM Connections or Quickr files using the URL http://**.**.**.**/WebDav/webdav/greenc where the ** must be replaced by the IP address or host name of the Tomcat server running WebDAV.
How to use and setup several WebDAV clients, please visit this page.
User logging is enabled by default and is logged in the (for example) C:Tomcatlogswebdav_users.log
Next steps would be setting up HTTPS on the Tomcat server and securing this server. These actions are not described in this document.
In most cases you must add the HTTPS certificate of the Quickr or Connections server to the Java Keytool program because you might encounter this error messages in the File Jockey WebDAV log file of Tomcat.
12:38:07.6 [ERROR] ey: sun.security.validator.ValidatorException: PKIX path building failed: sun.security.provider.certpath.SunCertPathBuilderException: unable to find valid certification path to requested target
12:38:07.6 [ERROR] ey: IOException – Could not connect to the quickr server at: quickr.lialis.com
The solution is simple and described in detail in this article: Self signed HTTPS certificates for Lotus Domino. No worries, the keytool approach for Apache is the same as for Domino.
You will find the Java keytool program in the folder C:Program Files (x86)Javajre7bin
Here is an example of the command line command.
cd “Program Files (x86)Javajre7libsecurity”
….binkeytool -importcert -keystore cacerts -storetype jks -alias lialis -file C:PublicKeyslialis.*
Make sure the certificate file you sue contains the public key of your HTTPS certificate
This guide assumes a clean installation of Ubuntu Linux
The first thing to do is to update the Ubuntu software repository and install a clean copy of Apache Tomcat 9
In a terminal type:
sudo apt update
![]()
Type the password to update the repositories, this might take a while.
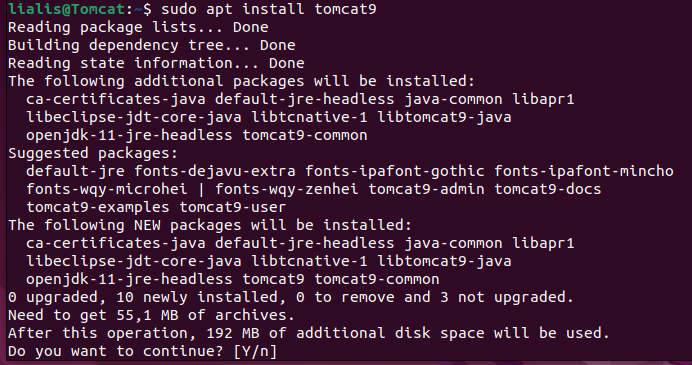
Install Apache Tomcat 9 by typing the following command.
sudo apt install tomcat9 tomcat9-admin
The OS will determine the dependencies, present them to the user and prompts for confirmation. Type enter or y to continue with the installation.
Next we want to check the user running the Tomcat server, which is in turn running as a Java task. So we check the running processes for java.
sudo ps -Al | grep java
![]()
As can be seen in the 3rd column the java task runs under userid 999, which we’ll have to look up in the system users in ect passwd
![]()
![]()
As expected the name of the user is tomcat, which is the default user in a clean Ubuntu installation of Apache Tomcat.
Next we’ll create a folder where FileJockey can place its configuration files. I’m choosing to use the homedirectory of the tomcat user. And make sure the tomcat user has access to this folder, by making it the owner
![]()
![]()
Create a Apache Tomcat administrator user to access the manager portal
![]()
![]()
Go to the end of the file and just before the closing end tag add the following roles
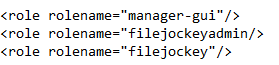
Now add a Tomcat administrator. (Please use more secure name and password than illustrated here) And save and close the editor. (ctrl+O, ctrl+X)
![]()

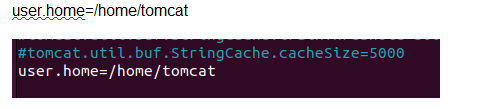
Add a user.home variable to the catalina.properties file

Restart the tomcat service, to update its configuration.
sudo service tomcat9 restart
![]()
With a browser now connect to the Apache home page over http. http://<server address>:8080
Click the manager-webapp link and login with the tomcat credentials created earlier.
Scroll down to the “WAR file to deploy section” and click the Browse… button. (The name of this button may differ depending on the browser)

Click the “Open” Button and then deploy the application.
Open a new browser window and on the same server as before go to http://<servername>/FileJockey/admin/main.jsp to open the FileJockey administration page. (After logging in with the same credentials as before)
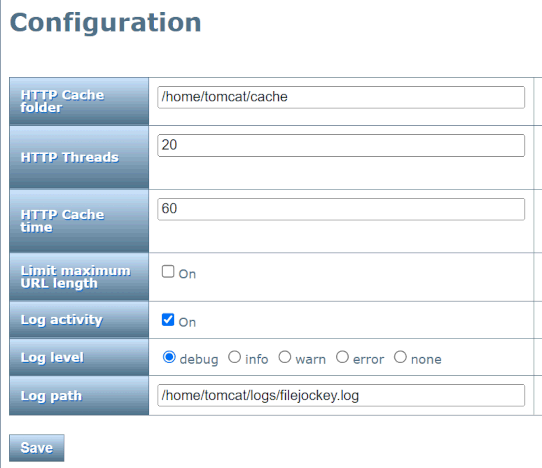
Click the Configuration button and change the following fields.
“HTTP Cache Folder” to “/home/tomcat/cache”
“Log path” to “/home/tomcat/logs/filejockey.log”
and click the save button
If you have a license, click the license button, enter your license and save the page. Up to 10 licenses can be used here.
Now go back to the Tomcat Web Application Manager and click the reload button in the FileJockey table row. This will restart the filejockey application with the new configuration values.

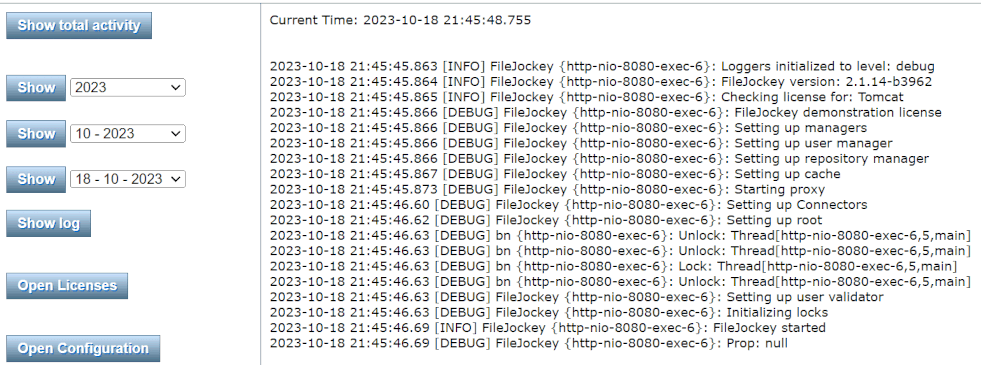
Check if the configuration is valid, by returning to the FileJockey administration page and clicking the “Show Log” button.
If all is well it the log should load correctly
Now we return to the terminal and edit the web.xml deployed by FileJockey.
First we need to find where tomcat has deployed it by using the find command
![]()
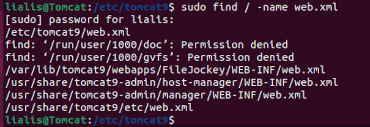
In my case the correct web.xml was found in “/var/lib/tomcat9/webapps/FileJockey/WEB-INF/web.xml”
Recognizable by the webapps and FileJockey parts of the path.
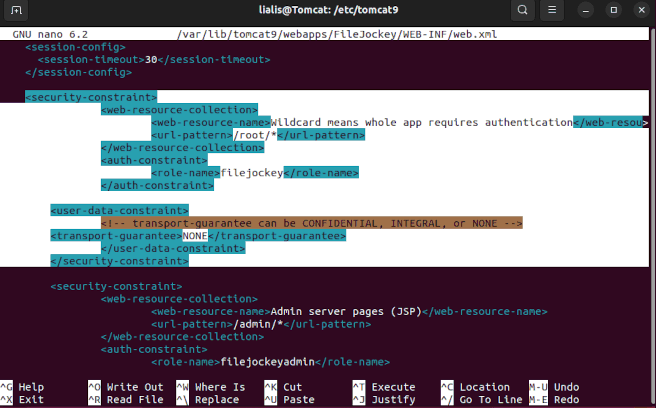
Edit the file and remove the security constraint for all users. NOT the constraint for administrators. As marked in the screenshot below.
![]()
![]()
Reload the FileJockey application again in the “Tomcat Web Application Manager”
Now we can configure the repositories in FileJockey. In the filejcokey admin page click the repositories button and delete all existing example repositories. And fill in the correct details for the connections server you want to connect to.
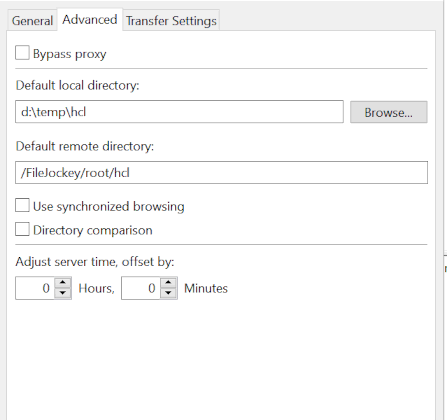
For the data source make sure you only have the schema and domain name and no path components. The name of the repository is how we will refer it later with the WebDav client
When using a WebDav client to connect, make sure that the remote path is set up to /FileJockey/root/<name of your repository>
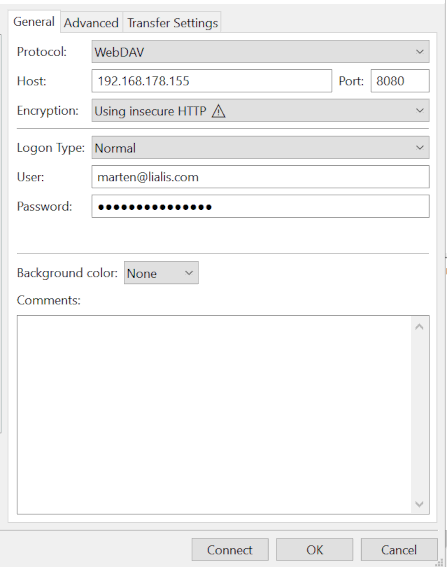
Example configuration in “FileZilla Pro”
File Jockey installation guide for Lotus Domino
This document contains a detailed installation guide of how to install File Jockey on a Lotus Domino server for IBM Lotus Quickr, IBM Lotus Quickr for Portal, IBM Connections and/or Lotus Notes databases. This guide is based on File Jockey version 1.5.0.
Detailed installation guide
Download File Jockey. There is one package which holds the File Jockey software with support for IBM Lotus Quickr for Domino, IBM Lotus Quickr for Portal, IBM Connections and Lotus Notes databases.
File Jockey version 1.5.0 now also runs on Apache Tomcat and IBM WebSphere server. The WAR file needed for these Java servers are included in the single download package.
Prerequisites
We advise you to install File Jockey on a dedicated IBM Lotus Domino Server. File Jockey can be installed on the Domino server running Quickr, but then you must enable internet sites which is not supported by IBM. You will for example experience problems with uploading large files to Quickr in this setup. File Jockey is Domino server operating system interdependent.
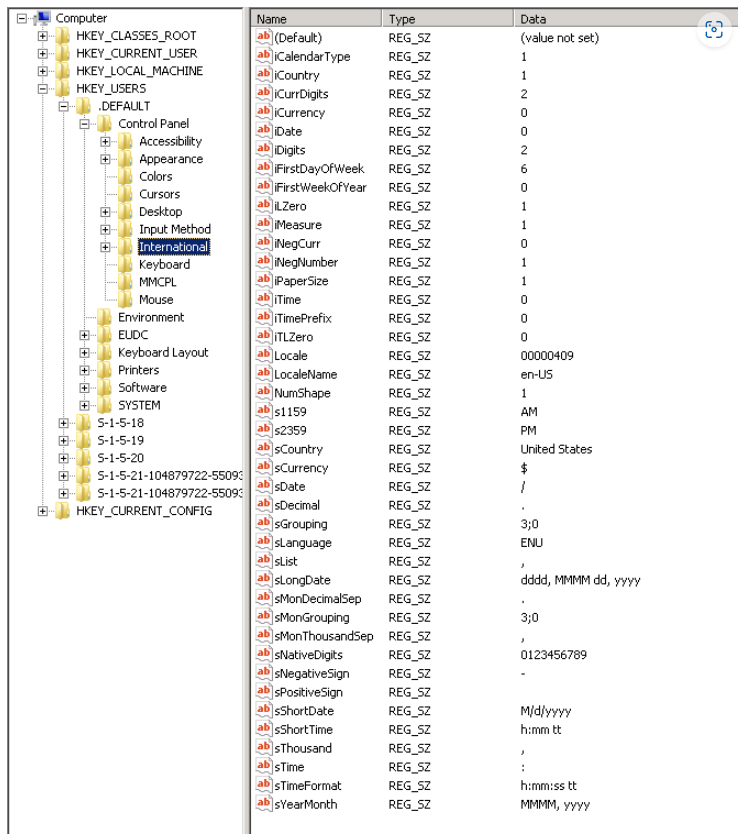
Make sure you set the regional settings to US standard, for a Windows server you must make sure all settings are set as listed below.
For proper functioning of File Jockey it is important that you first configure the Domino HTTP(S) task properly. Please enable “Load Internet configurations from ServerInternet Sites documents:” in the Domino server document and create an internet site document. The host name you mention in this internet site document must be a proper DNS host name. To test the Domino HTTP task you can try to access the log.nsf on the domino server, for example http://dominoserver.company.com/log.nsf. Most File Jockey problems are caused by internet site documents, for example a default internet site document may not be active. Single sign must be disabled in the internet site document because File Jockey is not supporting this feature.
Please consider the following introductions about the user authentication.
When using File Jockey for Quickr for Domino or Lotus Notes database the Domino server running File Jockey:
- can be equipped with a replica of the Domino directory with the person documents which are equal as the person documents used on the Domino Quickr or the Lotus Domino server (for File Jockey).
- can be equipped with Directory Assistance linking to Domino directories on the current or other Domino server. Domino Directory Assistance linking to LDAP directories are ignored by File Jockey.
- In the File Jockey configuration database you can setup LDAP authentication, more details will follow in this document.
When using File Jockey for IBM Connections or IBM Quickr for Portal the Domino server running File Jockey:can be equipped with a Domino directory with the person documents which are equal with credentials as the credentials used for IBM Connections of Quickr for Portal.
Domino Directory Assistance linking to LDAP directories are ignored by File Jockey.
In the File Jockey configuration database you can setup LDAP authentication, more details will follow in this document.
You may configure the Domino HTTP task with or without HTTPS support. When you use HTTPS make sure the HTTPS certificate is signed by a proper signing authority (for example verisign) or follow this self signed HTTPS certificates for Lotus Domino procedure to instruct the Domino server to trust the self signed signature used on the server for IBM Lotus Quickr, IBM Lotus Quickr for Portal or IBM Connections. Make sure the Domino server HTTP address is listed in the company DNS.
Your Notes Admin account must have full access administrator rights and Sign or run unrestricted methods and operations rights in the File Jockey Domino server document while performing the installation of File Jockey.
Installation steps
- You will receive the File Jockey package download link email first and a license key email a bit later.
- Extract the received zipped package to any folder on your work station (not on the Domino server).
- Sign the filejockey.nsf using with your Notes ID on your administration client (to see the local files do file open server and type local).
- Open the filejockey.nsf file in your Lotus Notes (administration) client.
- Check the filejockey.nsf ACL, give administrators and servers groups manager access. Set default and anonymous to no access. In most cases the ACL set by Lialis is correct. Roles are not needed.
- Create a database copy of filejockey.nsf on the IBM Lotus Domino server where you are planning to run File Jockey on (in the root with the same file name). Open filejockey.nsf on the Domino server for the following steps.
- Press the link “3. Licence” to enter the licence code you received, make sure you remove trailing spaces at the beginning and the end of the licence key.
- Press the link ‘2. Configure to set the File Jockey configuration’.
- First you must set the location of the file cache (for example c:wdcache), this is a directory on the Domino server running File Jockey. If you run Linux make sure you set the folder correctly (get rid of c:). The cache folder will be created when it does not exist during starting File Jockey which is part of the Domino HTTP task.
- Set the number of http threads, for now 100 threads is fine. Please consult this HTTP performance tuning document about this setting during the production phase of File Jockey.
- Set the Cache time in minutes. File Jockey will cache files when they are downloaded the first time by users. The time set will be used by the Domino server to remove these cached files after x minutes. Longer cache time will increase the File Jockey server performance experienced by users, but will consume more disk space. We advise 1 or 2 days for this setting. You don’t need to backup these files. If you reboot (or stop/start) the HTTP task of the Domino File Jockey server, File Jockey will remove the cache files. If you are using scheduled HTTP tasks reboots please keep consider this.
- On the LDAP page you may choose to configure LDAP authentication for your users. More details can be found in this LDAP authentication for File Jockey document.
- On the Debug page logging and debug setting must be configured. You may choose to use a dedicated File Jockey WebDAV log file (for example wdlog.nsf) or not. If you don’t enter a file name in the use dedicated log file field the Domino server console and log.nsf will be used. You may enable user activity logging which will only work if you set a dedicated log. You must set the debug level, please use INFO for normal situations or use TRACE for debugging. Note that TRACE debugging will create enormous amounts of logging information and will decrease the File Jockey performance significantly. Lialis has created an extensive File Jockey WebDAV and Domlog analyzer tool with a Management dashboard.
- Go to Users part of filejockey.nsf and add the users by clicking on the Import (for Domino) or Import LDAP (for LDAP users) button. The Import (for Domino) will use the location document of your Notes client to determine which Domino directory server to use.
File Jockey will reload new users directly. You may enter many users, though the amount of users validated is limited by the licence key supplied by Lialis. Not validated users are not allowed to use File Jockey on this Domino server. - The filejockey.nsf database contains an automatic installer to install File Jockey on your Domino server. Press the link ‘1. Install’ to carry out the installation. First you are requested to choose an internet site document. The installer will create an internet site document when one does not exist. IMPORTANT, you must set the Domino File Jockey HTTP host name in this internet site document created by the installer when you choose to create an internet sit document during the File Jockey installation. When the installation is carried out it will reboot the HTTP task to make this change effective. More details on the changes implemented by this installer can be found in the File Jockey automatic installer document.
- Go to Repositories and add for each Quickr, Connections or Domino server a repository document. You may enter multiple repositories, there is no limit. Quickr for Domino or Portal usage the same repository type in the File Jockey configuration database.
- Give the repository a proper name, use lower capitals and no spaces. This name will be used in the URL’S, so make the name short, unique and understandable.
- In Type choose between Connections, Quickr or Domino.
- In datasource enter the Quickr or Connections URL (for example http://quickr.lialis.com) or choose the Notes database server and file name. You may add the port number if the port is not standard (for example https://quickr.lialis.com:446). When using Type = Domino you must select a Notes database. You may select a Notes database on the File Jockey or on a remote Domino server. If you use a remote server make sure there is a connection document in place from the File Jockey server to the Domino server holding the Notes database. When using Type = Domino you must select a view or folder which holds document with files in the Notes database (writing to back is only supported to a folder).
- Upload limit can be set with a maximum of 100.000 KB
- Enable write support to allow your users to write back to Quickr, Connections and Notes database for example.
- In the ACL tab you may configure for Quickr or Connections the places that are allowed or denied. For example you may enter here a Quickr place that may not be accessed over File Jockey, or you can add the Connections streams Documents Feed and Libraries Feed to the Denied field. Every change in the repository document will be active after a Domino File Jockey server HTTP task restart.
- The advanced view displays the files used by the installer, nothing for you to do here.
- To apply repository or configuration changes made in filejockey.nsf the IBM Lotus Domino server HTTP task must be restarted by pressing the activate button in the filejockey.nsf or issue the server console command tell http restart or tell http q followed by load http. New licences or users are activated immediately.
- Take a close look at the Domino server console, it should display something like this example.
- HTTP Server: Using Internet Site Configuration View
- JVM: Java Virtual Machine initialized.
- HTTP Server: Java Virtual Machine loaded
- Servlet engine initialization was successful
- HTTP JVM: com.lialis.webdav.WebDav: init
- HTTP JVM: Configuring WebDav for Server: CN=App3/O=Lialis
- HTTP JVM: Initializing WebDav version: 1.5.0
- XSP Command Manager initialized
- HTTP Server: Started
- Open a new internet browser and add the correct URL. [http(s)]://[address]/servlet/webdav/[repository name]. Example: https://webdav.client.com/servlet/webdav/quickr – URL is case sensitive! You must sign in with your Notes or LDAP account (Lotus Domino short names are supported when you set Quickr and WebDAV server doc Internet authentication to More name variations with lower security). Make sure the user name is listed as File Jockey WebDAV user. File Jockey will then show the Quickr places, Domino folder or Connections folders. This test is only valid for a quick first check of File Jockey. Do not use the internet browser approach for File Jockey intensive testing.
- If you are having troubles at this moment please check this troubleshooting document.
- It is highly advisable to continue testing with the BitKinex client demo’ed here.
- You may consider to Shorten File Jockey webdav URL’s.
- It is possible to replicate the filejockey.nsf database between clustered Domino File Jockey servers.
- Please read these two documents in which the supported features are outlined for Connections, Quickr and Domino.
- Now the system is setup properly it must be handed over to the users. We have created two documents containing information for your users.Users working with File Jockey, Goodreader, Pages and Quickr
- Editing office documents on iPad, iOS office apps to be used, interaction with Quickr over File Jockey
- If you are still having troubles please create a support ticket here.
If you have questions, don’t hesitate to contact me!