
NDDM Technical Manual – Scanning
IBM Notes Domino Application Scan and Analysis tool.
Optimized for Domino Server decommission projects.
Lialis will always support your Domino Server Application Scan in short daily remote calls to ensure a perfect and swift scan.
Updated May 2023 for NDDM release 5.30
The NDDM Notes views are set to NOT refresh automatically. This has been done to speed up the NDDM scan process. Please press F9 in most of the NDDM views when you are working in NDDM!
At this stage all selected Domino servers have a replica of the Lialis NDDM Notes database. You do not need to open all NDDM replicas. NDDM has been designed in such a way that you can initiate all scan work in 1 NDDM Notes database on your main central HUB server. With task documents, each Domino server is instructed to carry out its own scan work. You only need to wait for the results to be replicated back to the central NDDM Notes database.
You might want to check the Domino server agent manager task settings in the Domino server documents. Scanning may take a few hours or days depending on the size. It is recommended to increase the agent manager run time to 12 hours for example. If the scan takes more time, then there is no problem: NDDM will continue the scan at the point where it was interrupted in the previous scan.
You also might want to create new Domino server replication connections documents between the HUB server and all the Domino servers to be scanned, where only the NDDM Notes database is replicated (pull push) in the shortest time interval of 5 minutes for example. This will speed up the work considerably.
Follow the order of steps as described below carefully.
Scanning – Import Notes databases. In this step, the Domino server adds a Database Info document for each database found. To make sure that no .nsf file is omitted, only information that can be retrieved regardless of database access is recorded (replica id, server, filepath and -name). This task will only take a few seconds to complete.
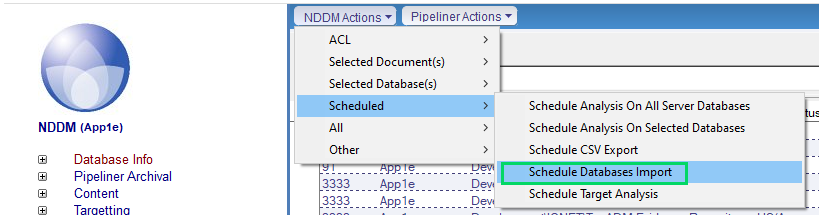
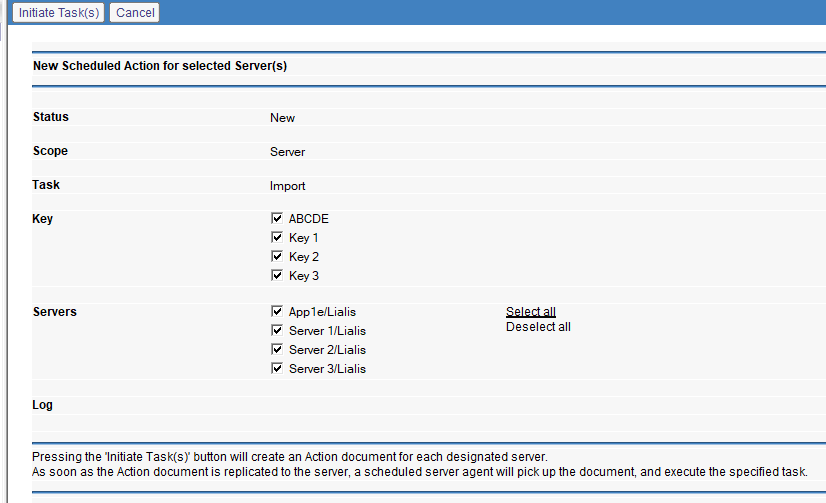
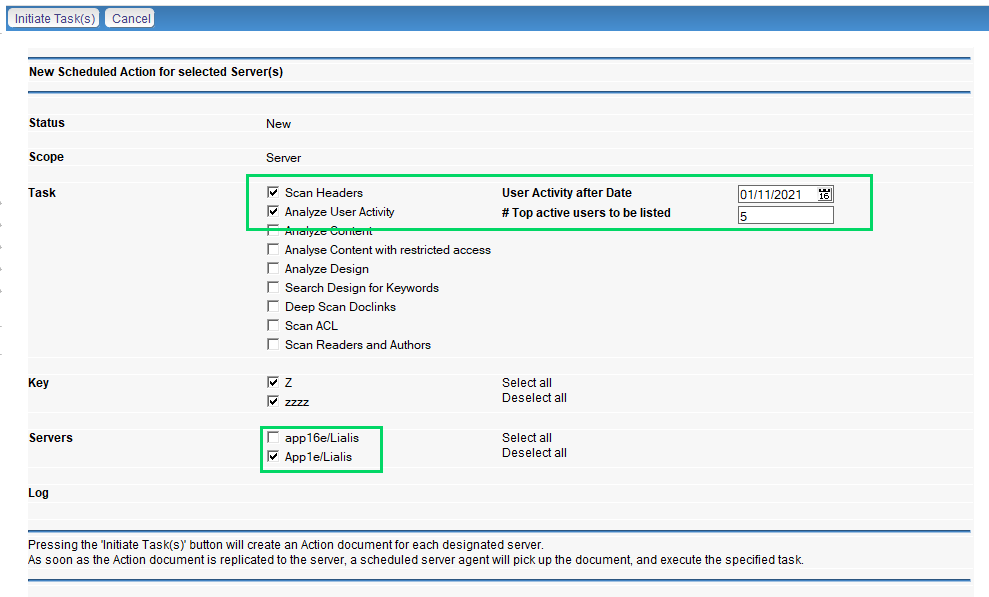
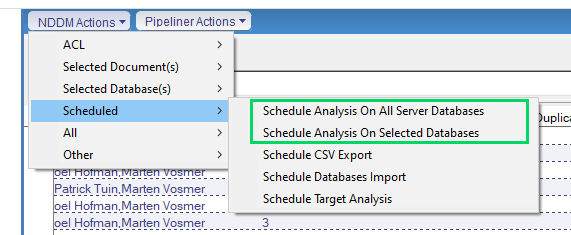
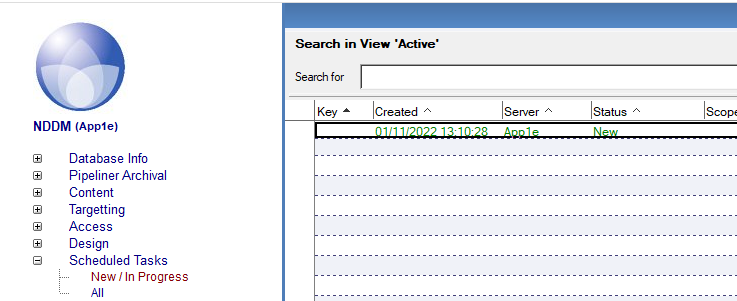
Select one, multiple or all Domino servers. Use the Key to filter away Domino servers.
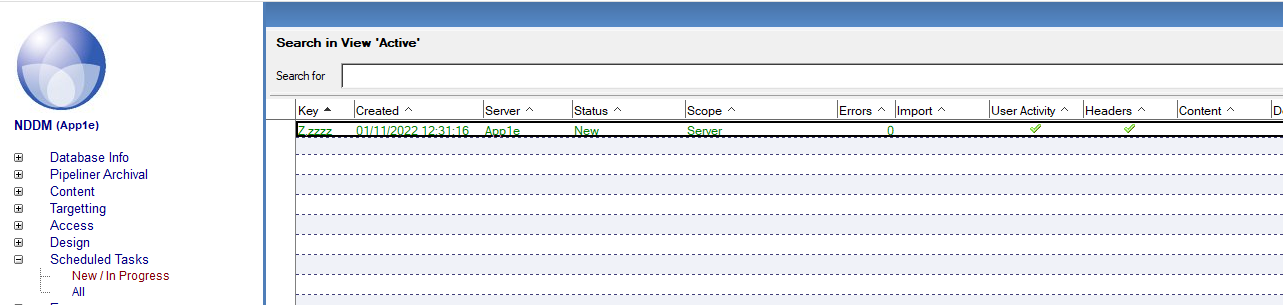
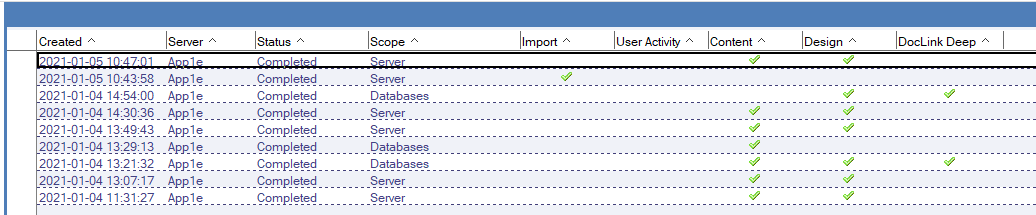
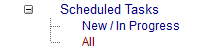
The scheduled tasks can be seen in this view:
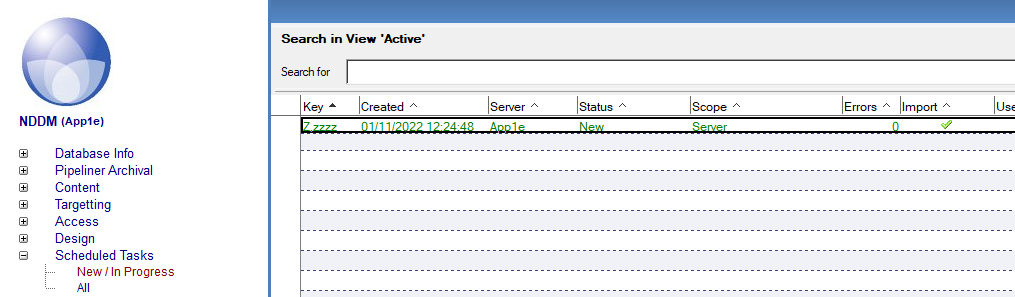
Now wait until the Domino servers have completed the import task. Each database on the server now has a Database Info document in NDDM.

A Domino server will run this Notes database import task in a few seconds. The only delay is waiting on the agent manager and the scheduled replication.
Note: if there are multiple new/in progress task documents for the same server, the scan agent will always pick the newest Task document to run on, which is the first displayed in this (unsorted) view. So make sure that you only create a second task document AFTER the server completed its first task.
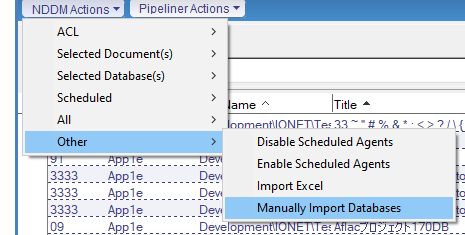
Ideally, use the ‘Scheduled On Domino’ option for all scan tasks to perform. Domino servers agents process data much faster than client-based agents. However, in certain cases you might want to run a task manually on the client. You can do so by using the ‘Manual On Client’ option in the navigator .
You can always re-run this step. The agent will simply add new Notes databases when they are found.
If you delete all NDDM content you can run this task also to start from scratch.
Make sure you improve the NDDM exclusion list and delete newly excluded files from NDDM simply by deleting the Notes database records in NDDM.
If Notes databases are deleted from the Domino server, the import task will inform you about this with help of this column in the Database Info view. A red cross will be displayed when a Notes database is no longer on the Domino server. You may then delete these records from NDDM.

When the Notes database import – conducted in the previous step – is ready, it is time to carry out the Notes database user activity scan. In this scan, the excluded Domino servers and Admin user names are skipped, thus not reported and not used in the analysis phase of the scan.
You want to know the real end users activity. Domino server and Administrators user activity is irrelevant
This manual will assist you to carry out the scan multiple times until only real end users remain. The separation of real end users from servers or system users is crucial for determining if a Notes database is still (actively) used in your organization.
As mentioned before, the user activity scan should preferably be performed by the scheduled server agent.
You may carry out the user activity scan on all imported Notes databases or on a selection of Notes databases.

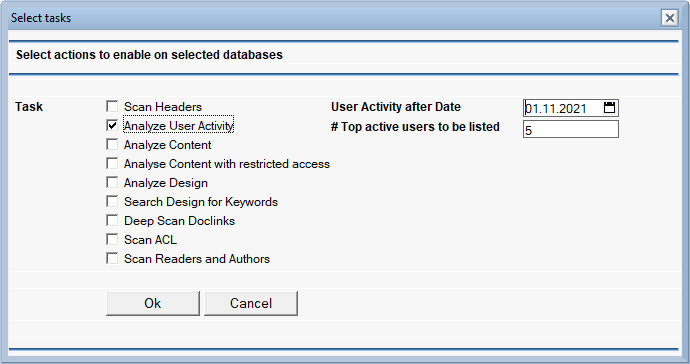
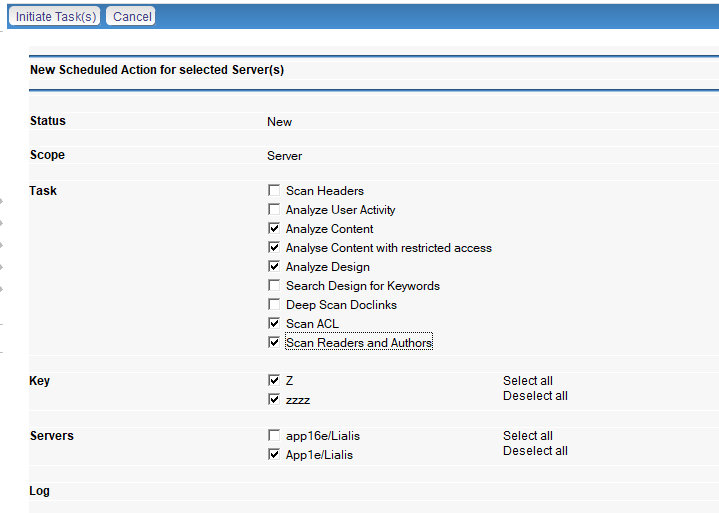
If you scan a selection of Notes databases, select “Analyze User activity” in the pop-up screen. When you perform a scan on all server databases, this option is selected by default.
A good approach is to start with 1 Domino server holding the majority of the Notes databases, so that we can extend the list “Users and servers to exclude from the user activity scan” in an effective and efficient way.
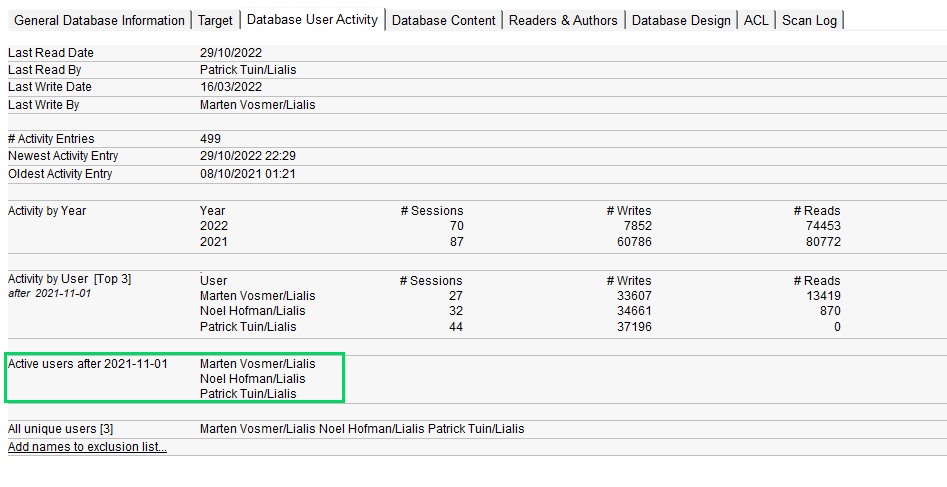
Besides collecting all Notes database user activity details per year, NDDM will also collect all user activity details per user. The ‘User Activity after Date’ box can be used to list all active users and their activity after the specified date. By default, the date is set one year back into the past. You can adjust this date if you like to.
NDDM will also collect the top x users in this time period. These 5 (for example) most active users can be used to communicate with, using the NDDM email tool (explained later on in this guide). You may change the top x number users if you like.
When the date and/or top x users fields are blank (or 0), these settings are omitted during the scan. All activity is then included in the activity per user and the top x active users.
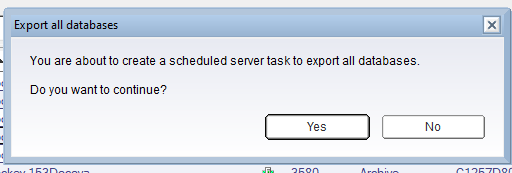
Press the button “Initiate Task(s)”. The scheduled scan tasks can be seen in this view:
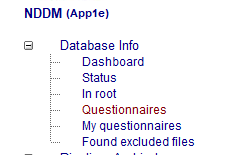
When the scan is completed open view ‘Database Info’:

Scroll to the right and sort the column ‘Last Read By’. Zip through the content and identify the first non real end user name (for example a Domino server, Admin, agent signer or Developer name).
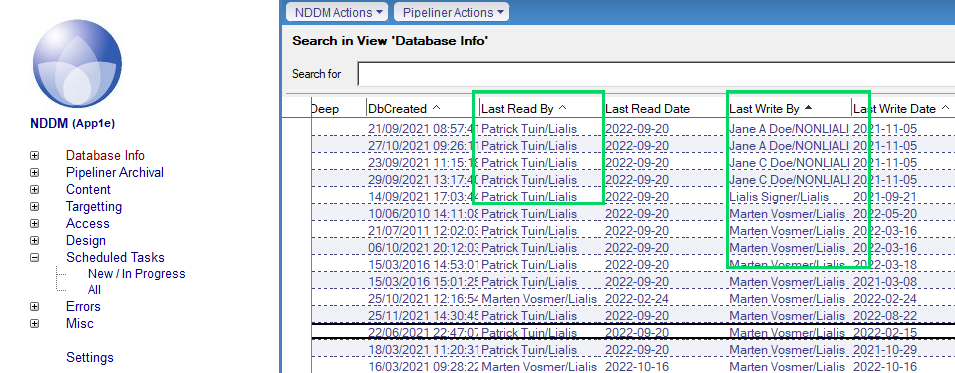
Simply open the Notes database scan document and press this green marked link. A pop-up will appear where you can select the non end user name(s) to add to the exclude list.
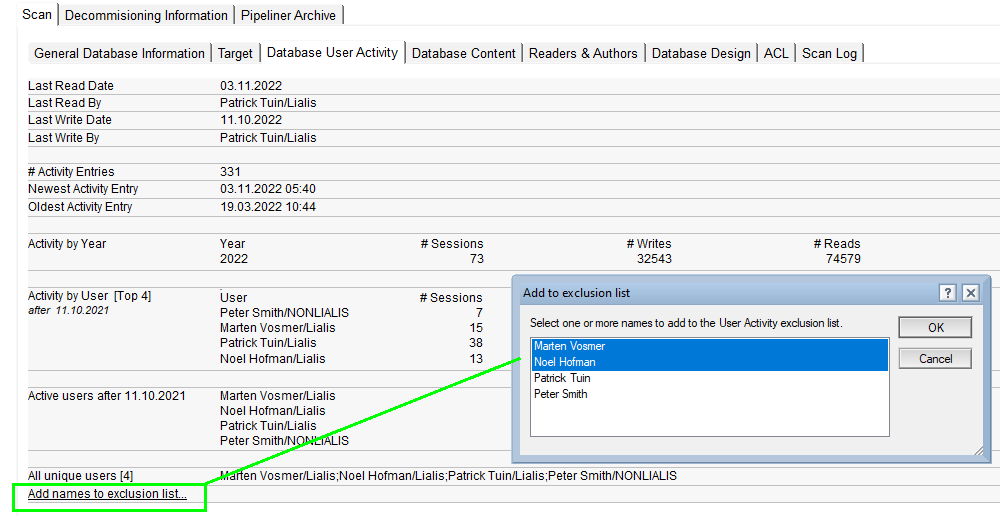
The user name(s) will be added to the exclude list of NDDM.
Carry out this exclude task for all non end user names found in the user activity scan in the column ‘Last Read By’.
Do the same with the column ‘Last Write By’. Go through the content and identify Domino server names, Admin names, agent signer names and Developer names in order to find all names that are not the real end users.
At this stage you have excluded all non end users for the first Domino server. Now you must do a new server-based user activity scan for the same Domino server. There is a big chance that new non end users will pop up in the columns ‘Last Read By’ and ‘Last Write By’. Exclude these names now and redo the user activity scan a few times until the 2 columns ‘Last Read/Write By’ only report real end users.
When the first Domino server only reports end users and all non end users are excluded, you can start scanning the other Domino servers for user activity. It is likely that you will find a few more non end users which you must exclude. When you exclude more names, you should do a re-scan of the user activity on the Domino servers where non end users where found. After a few new user activity scan operations, only real end users should be listed in the columns ‘Last Read/Write By’. Once again:
You want to know the real end users activity. Domino server and Administrators user activity is irrelevant
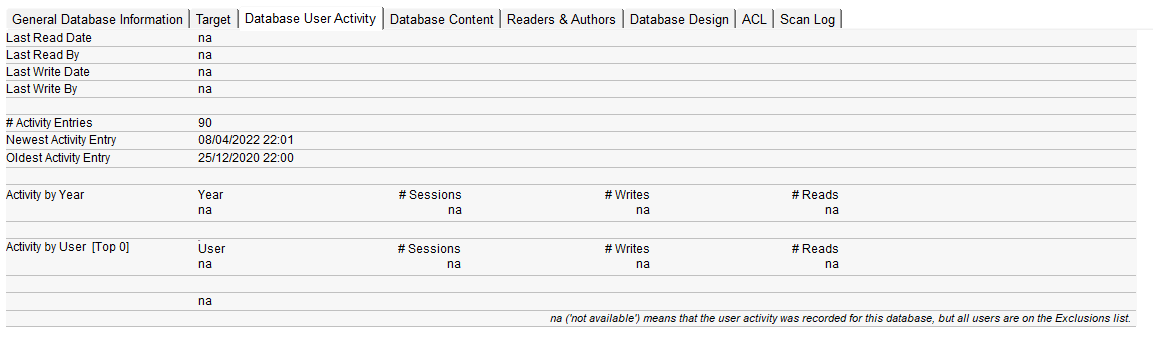
One remark on the user activity scan: “na” (not available) can indicate that – although user activity recording is enabled – there are no user activity entries, or that all user activity is designated to users that are excluded. In the latter case, it can be concluded that the Notes database is not used by real end users.
These are the possible scenarios regarding User Activity scanning:

Scanning Notes database user activity with the Notes client and excluding all non end users will take up to one day.
It is crucial the user activity scan does not show non end user names. You may improve the results later in the scan process
Normally the Notes database content scan is done after the user activity scan. The Notes database content is executed by the Domino servers in parallel, because this task will process a lot of Notes data.
Instruct the Domino servers to carry out the scan and sit back for the results to appear in the central NDDM Notes database.
You want to discover the dates when the Notes database content was last modified
You may select one, multiple or all Domino servers.
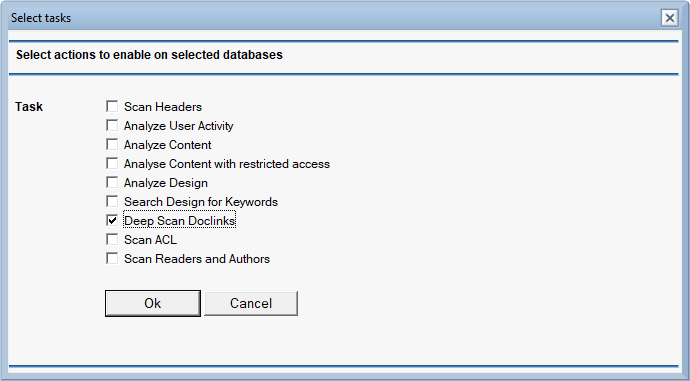
Do not enable Deep Scan Doclinks yet. We will do this later on.
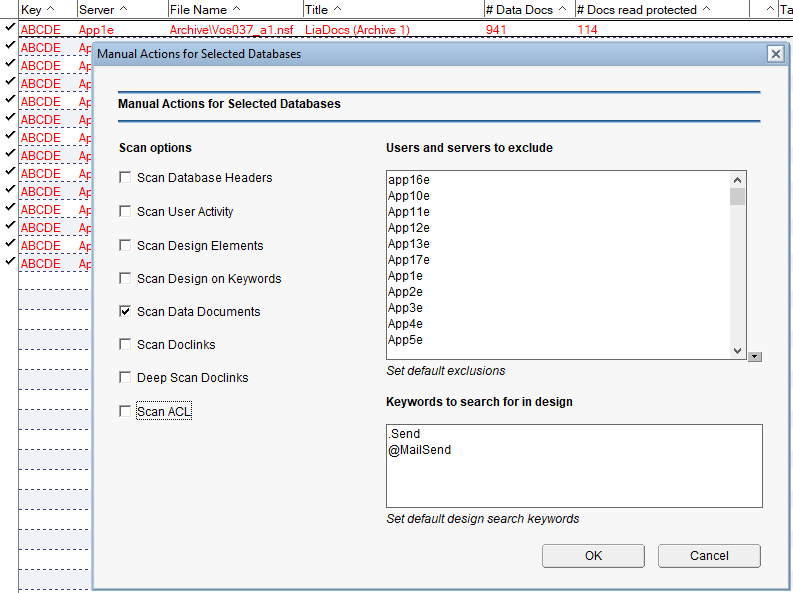
The option “Analyse Content with restricted access” will identify the number of Notes documents that have readers fields with no ACL roles listed in them. These documents cannot be read and will not be migrated to SharePoint in its current state.
The option “Scan Readers and Authors” will give a detailed report on how these fields are used in the Notes content.
Wait until the view “Scheduled Scan Tasks\All” shows that the content scan is completed on all servers.
A Domino server will run a Notes database content scan task in a few hours or a few days, depending on the database size and number of documents. All Domino servers will run this task in parallel, not sequentially. You must wait for the scheduled replication to retrieve data from all parallel scans.
A sample Notes database content scan result:
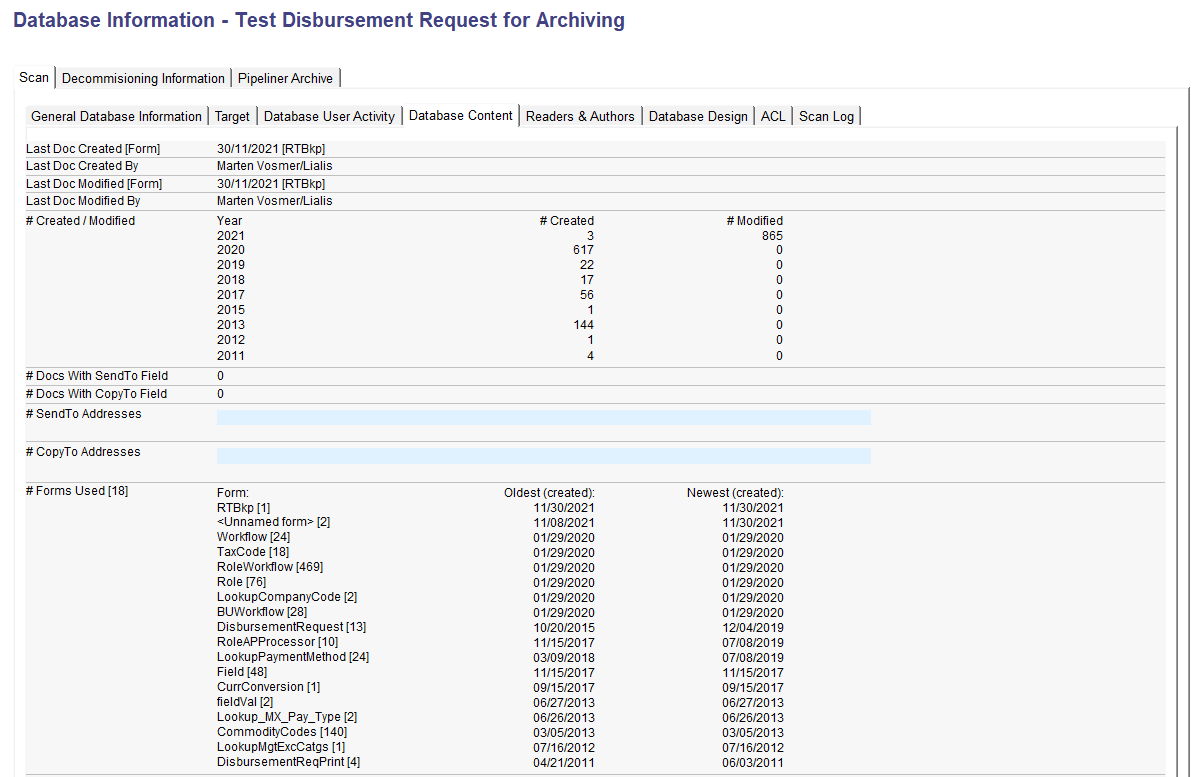
An important remark on the Last Doc Created/Modified fields: the Users/Servers exclude list is NOT applied here, because it is important to know if it was a Domino server, a signer ID, an Administrator or a real person who did last create or modify the content. The exclude list is only used in the user activity scan.
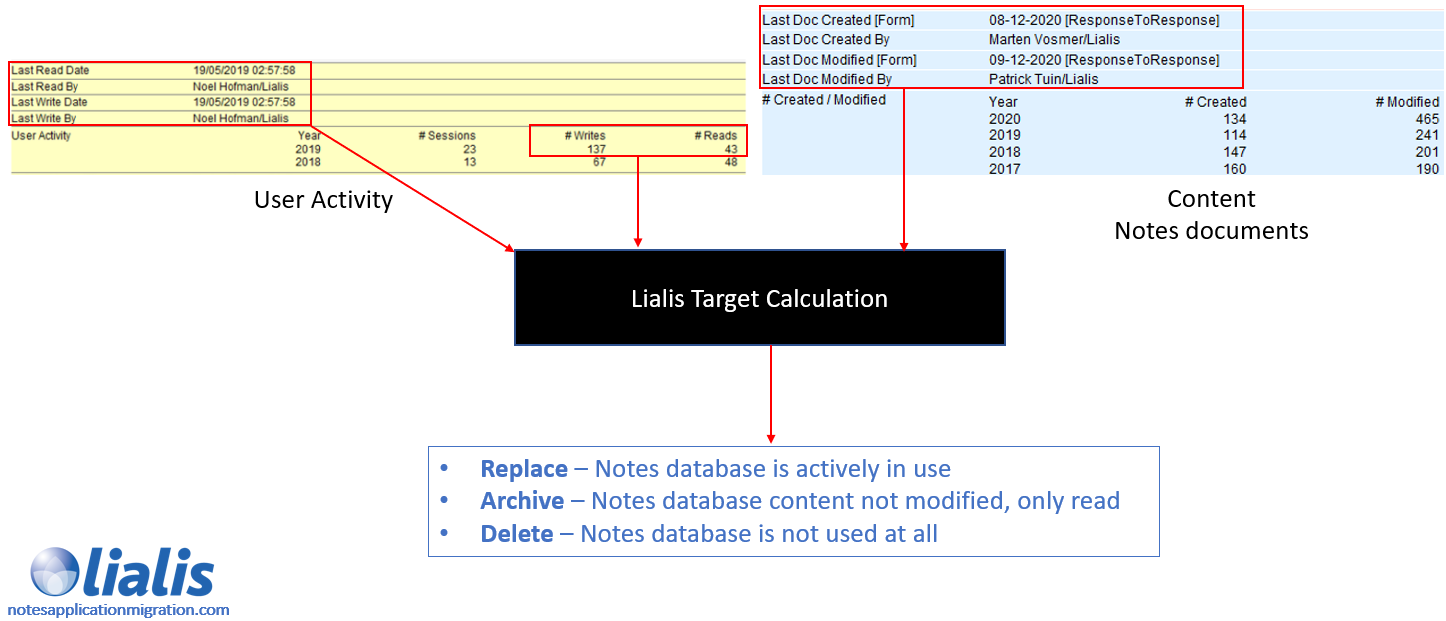
The Last Doc Created/Modified (By) data is very important to determine what to do with the Notes database in the step ‘target analysis’, which is explained further below.

At a later moment you may re-scan all or selected Notes databases to update the scan details, using the options in the left menu.
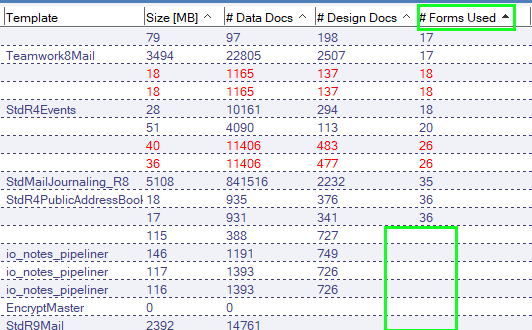
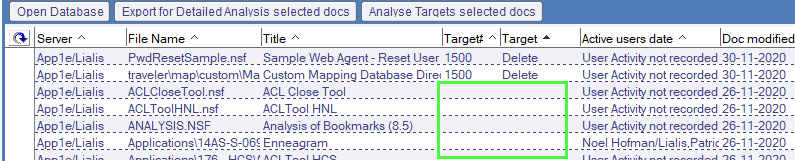
For the few Notes databases that encounter problems during the Domino server-based scan, you can apply a manual scan or redo a scheduled scan. You can find these Notes databases by – for instance – checking the ‘# Forms Used’ column:
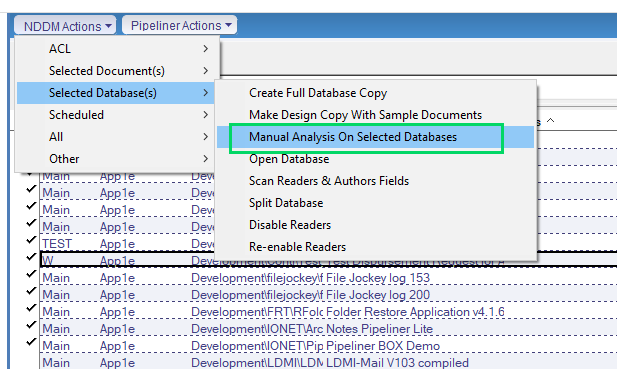
Before you manually scan these Notes databases, make sure to enable Full Access Administration in the Domino Admin client.
Now select these Notes databases and click on “Manual Analysis On Selected Databases”

The Domino server-based scanning agent runs under a same Notes ID that was used to sign the NDDM. Its possible that this ID does not have access to the complete content of some Notes databases. This sometimes happens when – for instance – an ACL Role is used in readers fields on the Notes document.
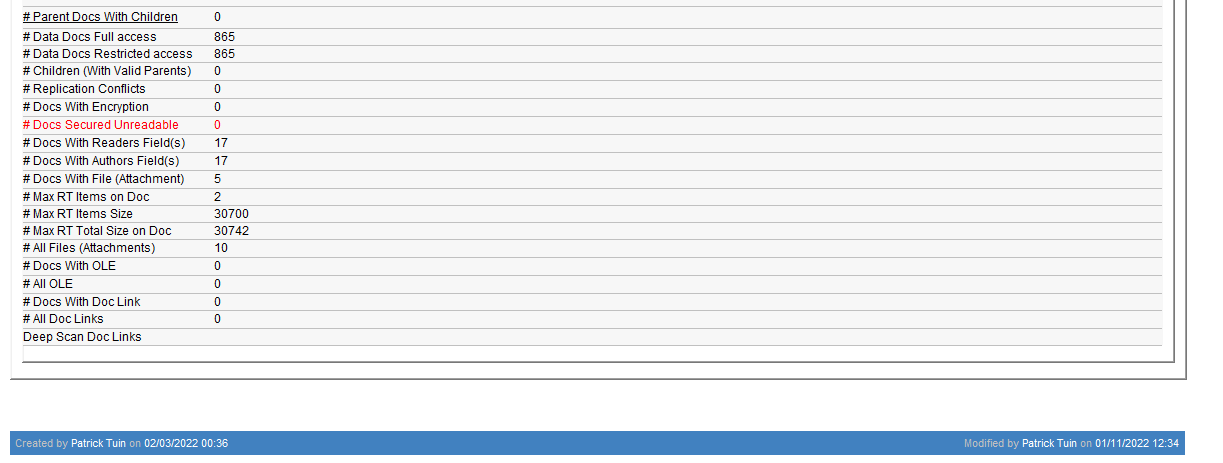
When the agent was unable to scan all content, the Notes database is highlighted in red in the view. For example:

The form shows the number of documents that could not be scanned, because they were read-protected:

To fix this, make sure the scanning signer ID has all roles in the Notes database ACL enabled. If this does not fix the issue, the problem may be caused by something else. A Domino administrator needs to step in to implement a fix resulting in a complete scan of this particular Notes database. However, it is already clear that this database is not going to be archived or replaced (see chapter ‘Target Analysis’ below), a complete scan for this database is not needed.
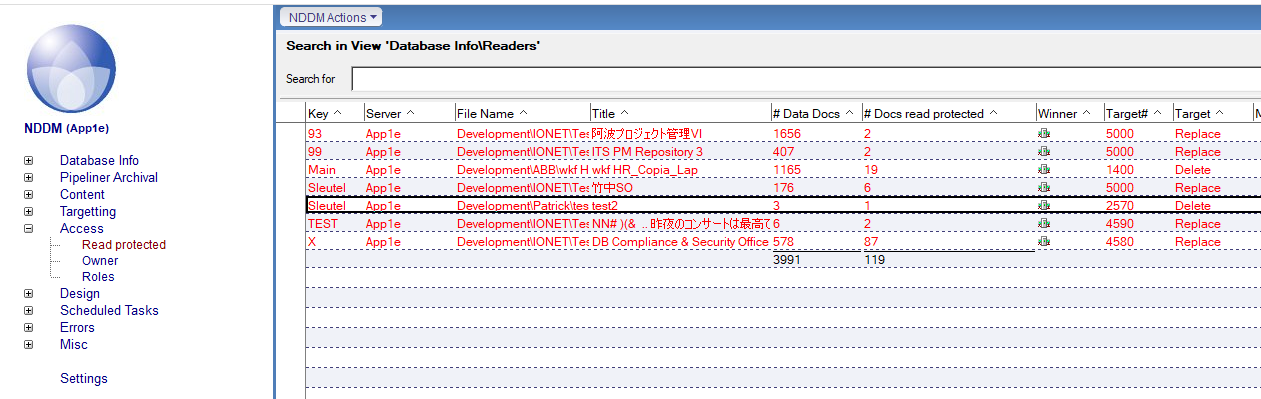
Under ‘Access\Read Protected’, all Notes databases are listed that contain 1 or more protected Notes documents.
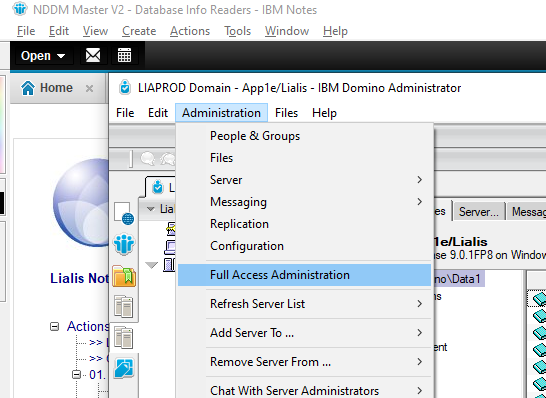
To get round the protected Notes documents issue, run a manual content scan of these databases with the Full Access Administration option in the Notes admin client enabled. By doing this, you can access most protected documents, resulting in a much better scan result. The image below displays the steps to be taken with regards to scanning read-protected documents.
NDDM has 2 views to report Notes databases where the user activity or content scan failed or did not complete.
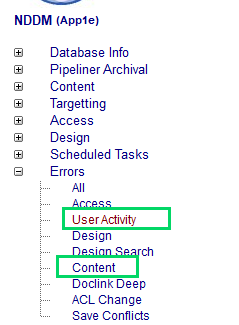
Make sure these 2 views are empty, then all Notes databases are scanned properly.
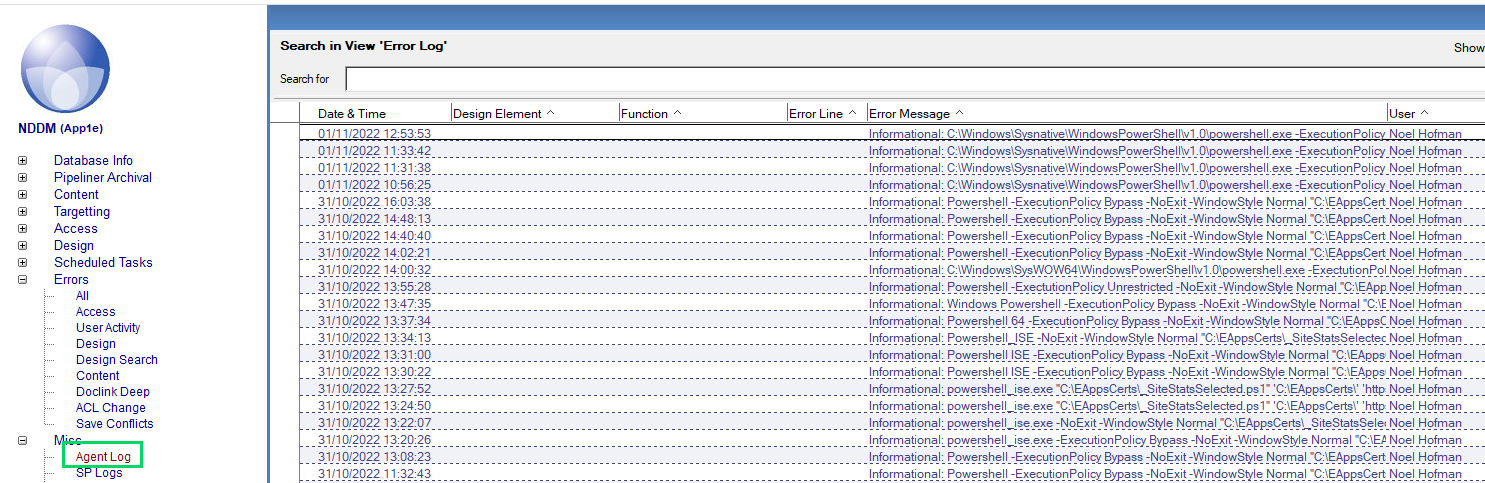
The scan log is displayed on the ‘Scan Log’ tab of the Database Info document. 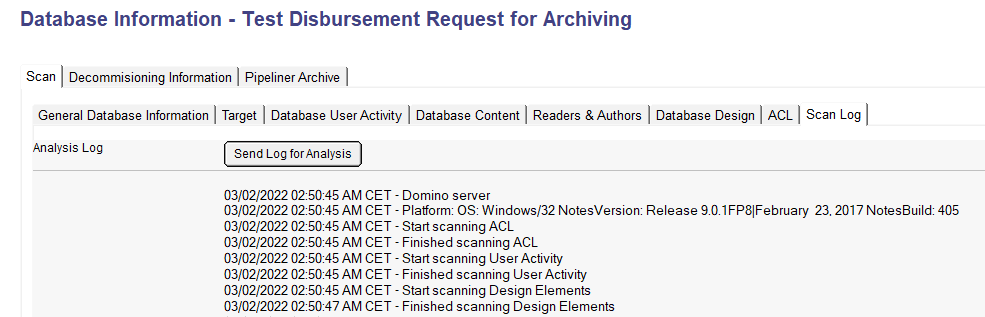
If an error or a situation of special attention occurs during a scan, the issue is listed at the bottom of this log:

For the User Activity scan, additional warnings and info are logged as well:

- Warning: User Activity recording not enabled for this database
- Info: User Activity recording is enabled for this database, but no activity was found
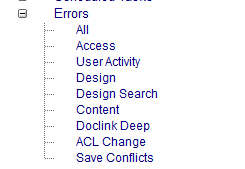
In the Errors views we have created multiple views where the scan errors are grouped.
In case of scheduled tasks, additional logging is displayed on the task document itself. This logging will also list errors that can not directly be traced back to a specific database.
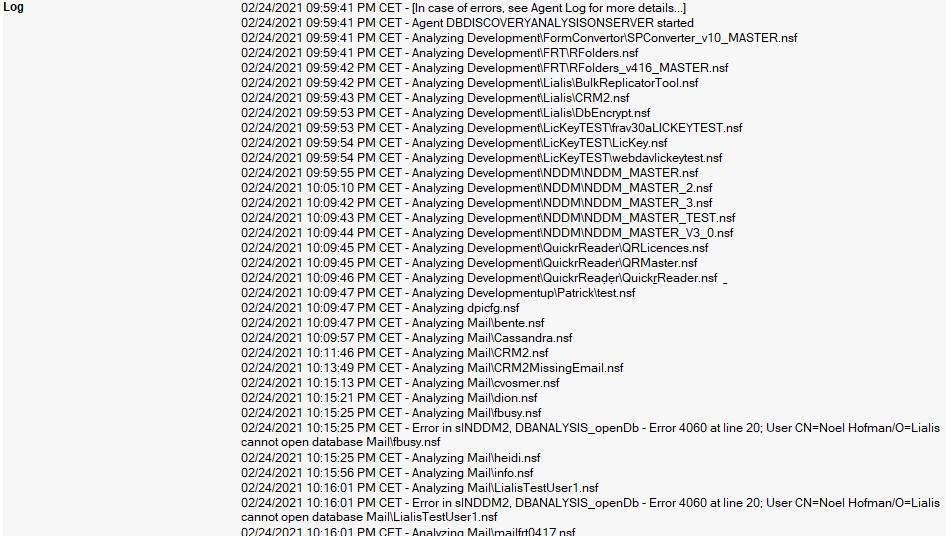
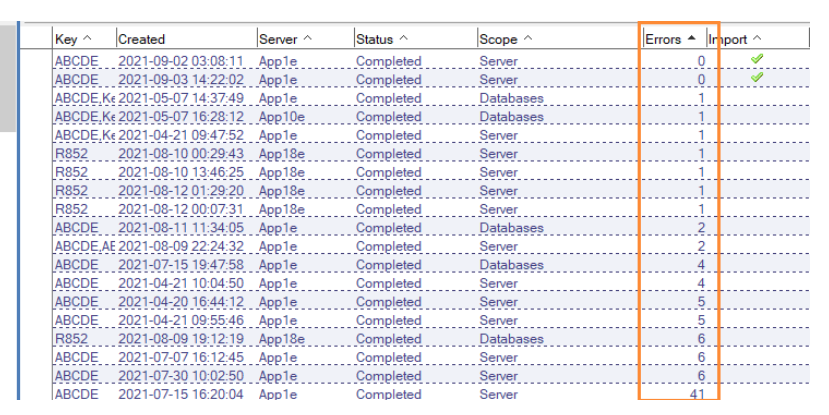
The Scheduled Scan Tasks\All view displays the number of errors found during the scheduled scan. These do not include the Warning and Info messages mentioned above.
Additional (fatal) errors and informational messages are logged in the Agent Log view. The errors mostly (but not always) correspond to the error on the Database Info and/or the Task form.
This logging capacity in NDDM makes it a lot easier to track down the cause for any error. Note, however, that in the compiled version, the error does not display the correct script line number.
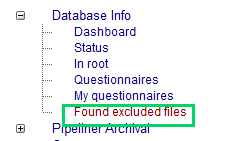
Found excluded files
Suppose during the scan you have excluded certain Notes databases that you already processed in a previous scan.
NDDM offers an easy way to find newly excluded Notes databases.
Press the ‘Scan For Excluded Databases’ from the NDDM Actions menu
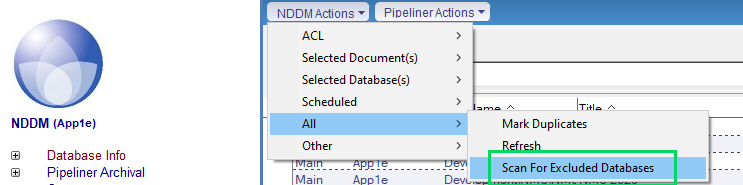
When the Notes agent is finished, navigate to the view ‘Found excluded files’ and simply delete these recently excluded database records.
In Root
The view ‘In Root’ displays all databases that are in the Domino server root folder. Normally this folder only holds system Notes databases that you want to exclude from the scan and delete from NDDM.

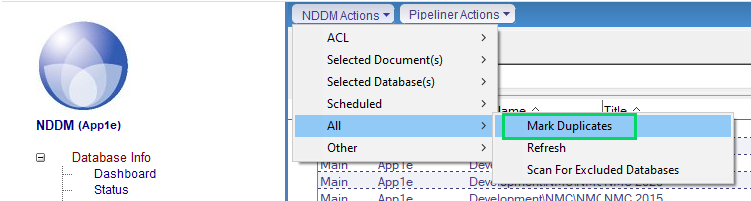
Mark Duplicate excluded files
This action will identify double excluded file names so you can delete double excluded file names from NDDM.
Now the scan is ready. You have collected a huge amount of details on all Notes databases which now have to be analyzed.
In this phase, NDDM will classify all Notes databases into one of these 3 main categories:
- Replace – Notes database is actively in use
- Archive – Notes database is only read
- Delete – Notes database is not used at all
Lialis NDDM has a set of Target calculation rules that will assist you to calculate the Targets automatically.
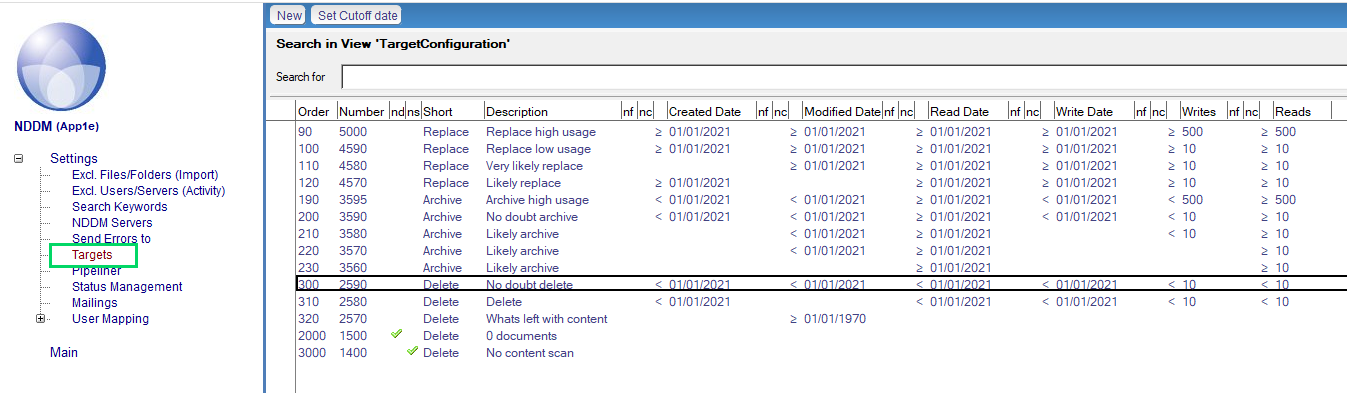
For each Notes database the content scan and the user activity scan results are reviewed by above listed target definitions. NDDM will calculate in which group (Replace, Archive or Delete) the particular Notes database fits.
The Targets setup we have supplied in your NDDM version may differ from the examples we give in this guide. The Targets setup we supply are based on the latest knowledge we have gained in our projects.
Lialis will always guide clients in the target calculation phase because of its complexity and importance
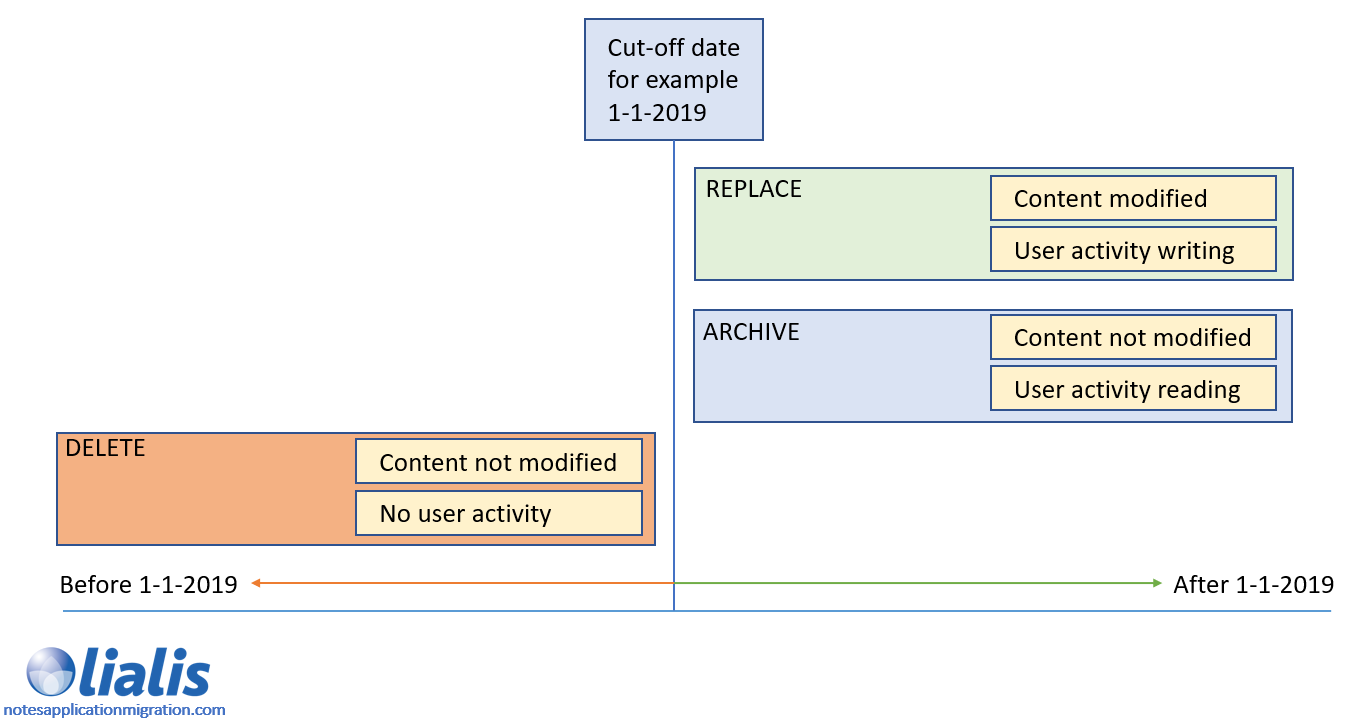
First you have to decide the target cut-off date; for example 1 or 2 years in the past.
In below diagram we have simplified the cut-off date approach we use in NDDM.
Use the ‘Set Cuttoff date’ button to easily adjust the cut-off date on all targets
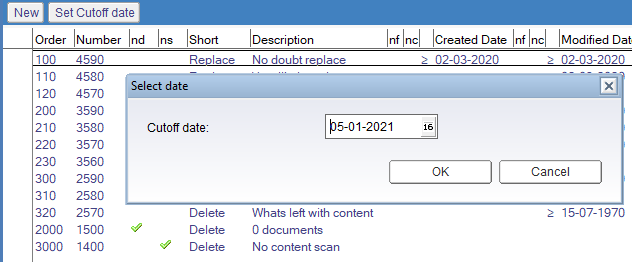
Important – make sure you restore task 320 to a date far in the past, for example 15 July 1970 !!!!!!!
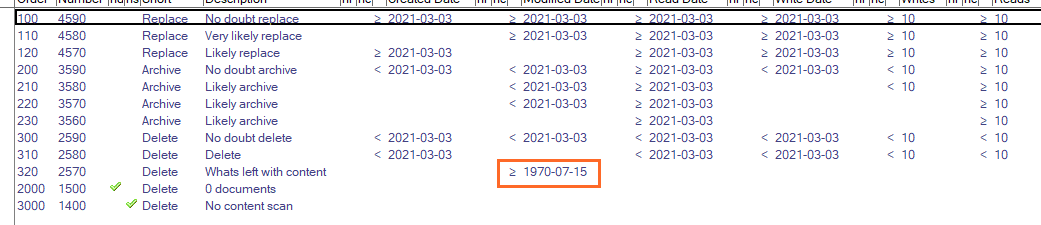
Not all Notes databases will fit nicely in one of the 3 categories (Replace, Archive or Delete). This is why we provided more than 3 target calculation documents in NDDM.
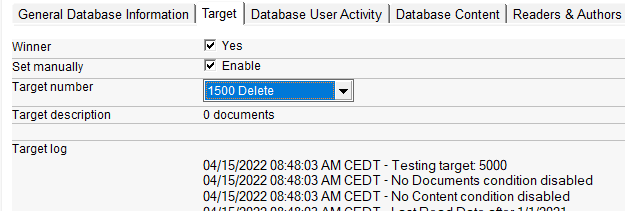
Lets look at the Replace target definition document in more detail.
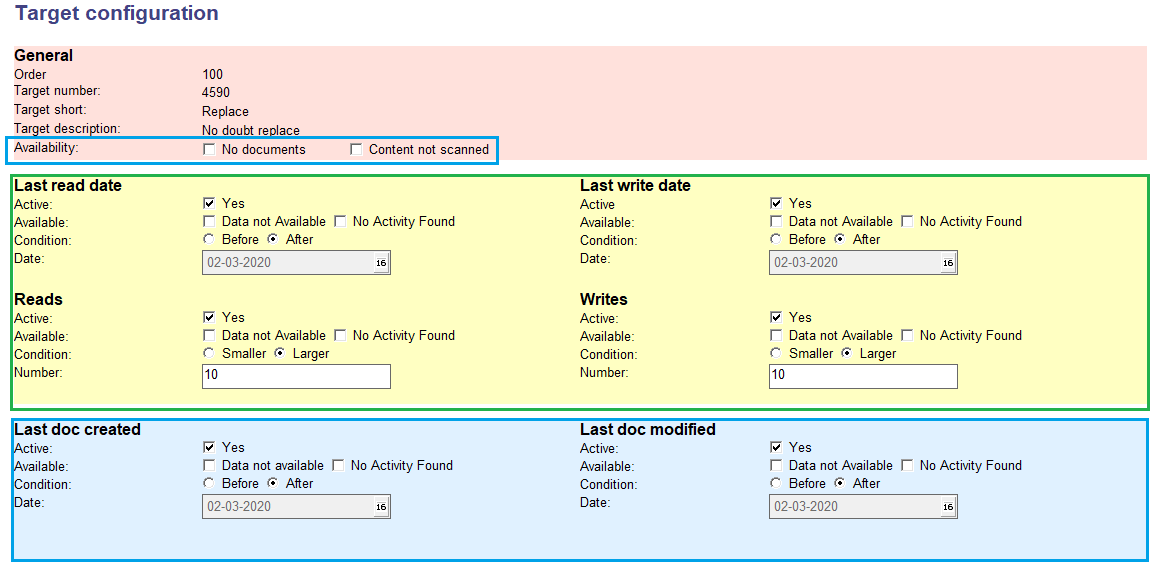
Target number is used later on in the process when we worry about Notes database replicas on multiple Domino servers.
Target short can be Replace, Archive or Delete. You may rename these if you prefer.
Target description has a very detailed naming of this particular target.
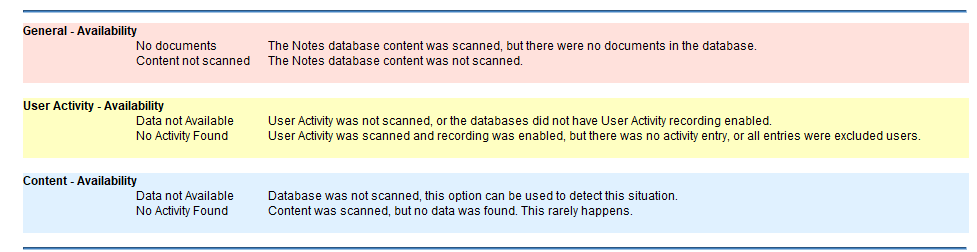
Availability it is possible to enable the following options:
The blue marked criteria (red and blue block) are applied to the Notes database content scan results.
The green marked criteria (yellow block) are applied to the Notes database user activity scan results.
- General – No Documents – when the Notes database has 0 documents
- General – Content not scanned – when the Notes content was not scanned
- Last Doc – Data not available – when the Notes content was not scanned
- Last Doc – No Activity found – when the Notes content was scanned but no Last Document data was found (rarely happens)
- User Activity – Data not available – when the user activity recording was disabled, or the user activity was not scanned
- User Activity – No Activity found – when the user activity is “na” (means there are no real users found after applying the exclude list on the user activity)
In the following fields you can set if this target is applicable. For example if the last document creation date is after a certain date.
Last doc created, Condition: Created after Date: 02-03-2020
Last doc modified, Condition: Modified after, Date: 02-03-2020
Last read date, Condition: Read after, Date: 02-03-2020
Last write date, Condition: Written after, Date: 02-03-2020
Reads, Condition: Larger, Number: 10
Writes, Condition: Larger, Number: 10
All criteria must apply to the particular Notes database scan results before the target is applied.
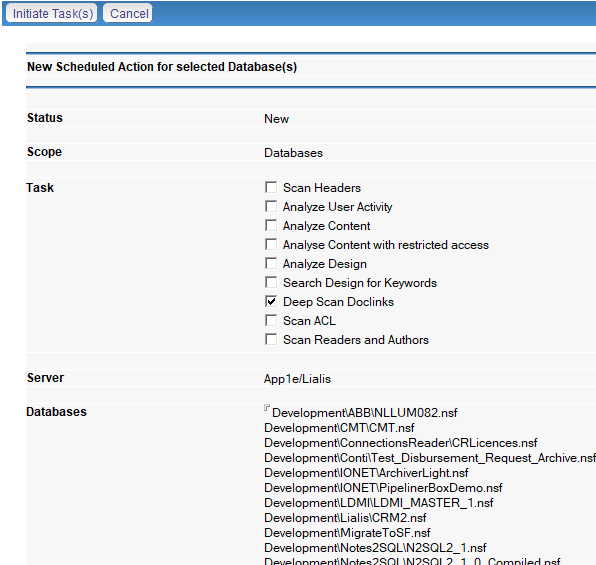
The target calculation may be carried out by the Domino server or by the Notes client. It is better to let the Domino server carry out this task because the Domino server will do it much faster compared to the Notes client.
In the view “Database Info”, press the button “NDDM Actions > Scheduled > Schedule Target Analysis “.
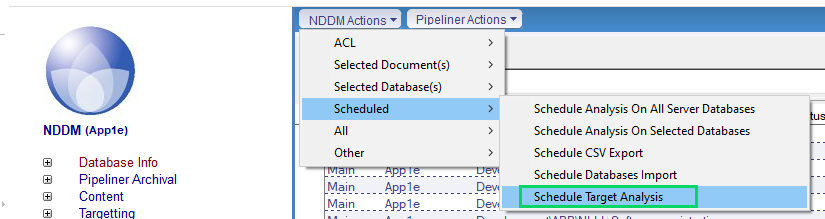
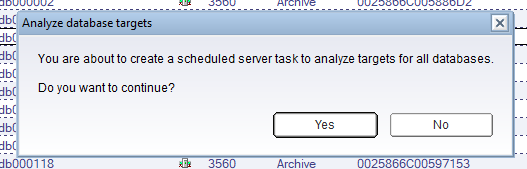
A new server task will be listed, wait for the server to carry it out.
With the targets supplied, we try to achieve that all Notes databases are targeted. However, this might not be always the case.
In the rare case that a target cannot be calculated, the below columns are empty in the main view Database Info.
On the Notes document you can follow the target calculation decisions made by the system. This will help you understand the target calculation and it will help you fine tune the target calculation.
Lialis support is always included to assist you in the target calculation and fine-tuning
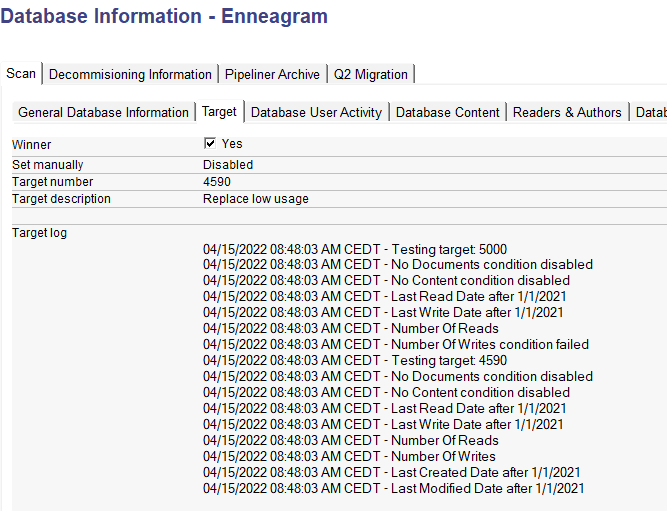
If a Notes database is replicated across multiple Domino servers, NDDM will calculate which Notes database replica is used the most, based on the available usage data. This particular replica will then be assigned the Winner role. The calculation mechanism is not very complex. The hub server icon (see image below) indicates that this particular Notes replica is the winner database. If a Notes database is not replicating, it will always get this winner role.
![]()
When all Notes databases with the winner role are migrated, or closed, or otherwise dealt with, you can be sure that all Notes databases in the whole environment are migrated and that all Domino servers can be decommissioned.
If you – for some reason – want to manually change the target from Archive to Delete, make sure to check the box ‘Set manually’ to prevent next target runs to overwrite your manual target settings.
In the NDDM views, Notes databases where the target has been set manually, are identified with this icon.

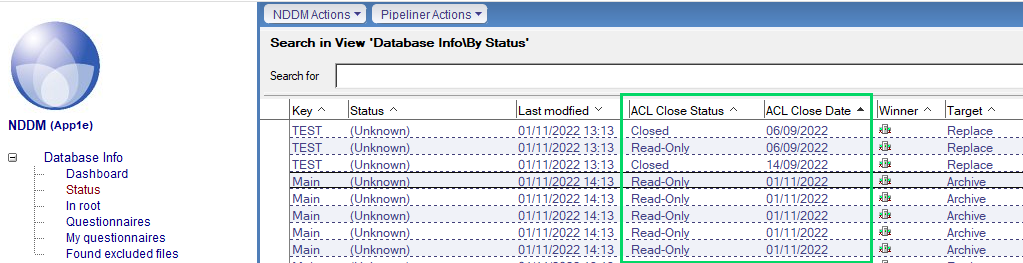
NDDM supplies 3 views to display only the Delete, Archive or Replace winners databases
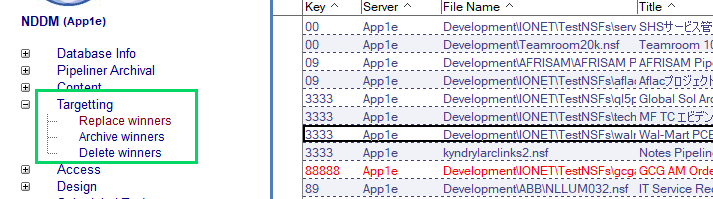
It is recommended to use these 3 winners views to carry out batch ‘ACL Close’ operations, or to send out emails with the NDDM survey tool for example.
A Notes database can have replicas on multiple Domino servers. Notes content is replicated between replicas, but Notes user activity is not replicated. This means that – with respect to the example of the Sales development database displayed below – 6 replicas of the same Notes database will be targeted differently on each Domino servers: 1 replica is targeted with Delete, 4 databases are targeted with Archive, and 1 database is targeted with Replace.

This real-life situation happens regularly, because Notes content is often modified on only one or maybe just a few of the many replicas. In this example, the so called ‘winner target’ will become ‘Replace’ because this target overrules the lower targets ‘Delete’ and ‘Archive’.
You might have wondered why the targets have a number. Well, this number is used to calculate the master winner target. In above example, 1 Notes database gained the target 2570 Delete , 4 Notes databases got the target 3560 ‘Archive’, and 1 database got the target 4590 ‘Replace’. The replica with the highest target number is assigned the winner status, which in this example is 4590.
Note that the numbers of the targets you received from Lialis may differ from the the numbers being used in this manual.
In the project execution, the Notes databases with the winner targets will be dealt with. The Notes database from this example will have to be replaced. When all winner Notes databases are either deleted, migrated/replaced or archived, the project is completed.
In future reporting, only the winner Notes databases should be used and reported, because they stand for the whole Notes database collection.
A good way to study and review the targets is to export the NDDM content to Excel (client-based, selected documents) or CSV (server-based, all documents in view) as illustrated below.
The client-based export may be very slow in large Notes environments, in this case use the server-based CSV export.
Export client-based XLS:
In Excel it is easy to review the target calculations made by NDDM, by having a close look at the columns that have the target definitions. Simply make the deletions in the Excel columns in the same manner as defined in the Target settings document and you will understand how NDDM does the target calculations for you.
Note that the columns we use in the target calculation are colored in Excel (this only applies to the client-based export).

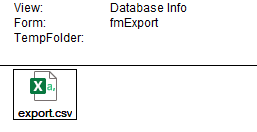
Export server-based CSV
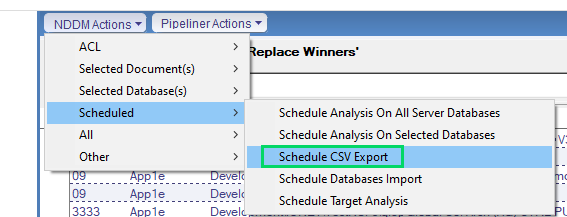
A new export task has been created to be carried out by the Domino server.
When the task is completed please find the csv file in this view

When the amount of data that has to be exported is very large (larger then 32.000 lines) NDDM will split the export files in multiple parts (export_000.csv and export_001.csv)
Save the CSV file to your PC
In Excel do this:
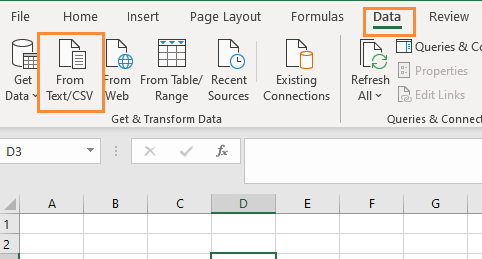
Navigate to the CSV file
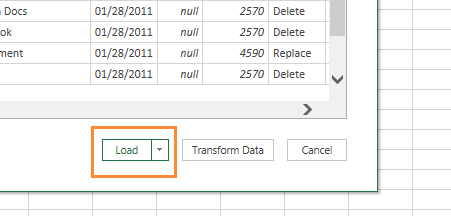
Press ‘Load’ in the import screen. This will export all NDDM data to Excel.
The Excel export provides additional information that is not displayed in the NDDM Notes views. For example, a listing of the design forms that the Notes database contains. Sorting on the forms column will give a great insight in Notes databases with a similar design. Notes databases that contain forms with the same name indicate that chances are high that these databases have a similar design, and thus may be grouped together, even if the template names are different.
Note that the CSV Export is done by a scheduled agent called EXPORTONSERVER. This agent should be allowed to perform restricted operations as described in section ‘Scheduled Agents’.
To organize the decommissioning of Notes applications, NDDM provides some fields that can be used freely.
These fields are displayed in several NDDM views.
NDDM provides an Excel import template that can be used to import data into these fields. This template is located in the NDDM ‘Using’ document.
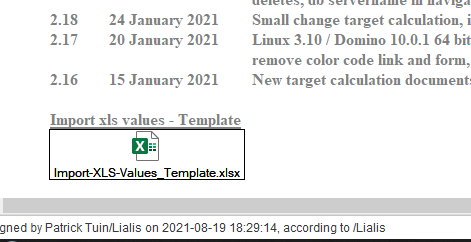
Save the Excel template to your computer.
The import will only work when the Domino server name contains the certificate (i.e. App1e/Lialis instead of App1e), and when the file path is found in the NDDM database info view.

Use the ‘Import Excel’ action to import this data into NDDM.

The import will run in the Notes client background, so please be patient and wait for this import task to complete
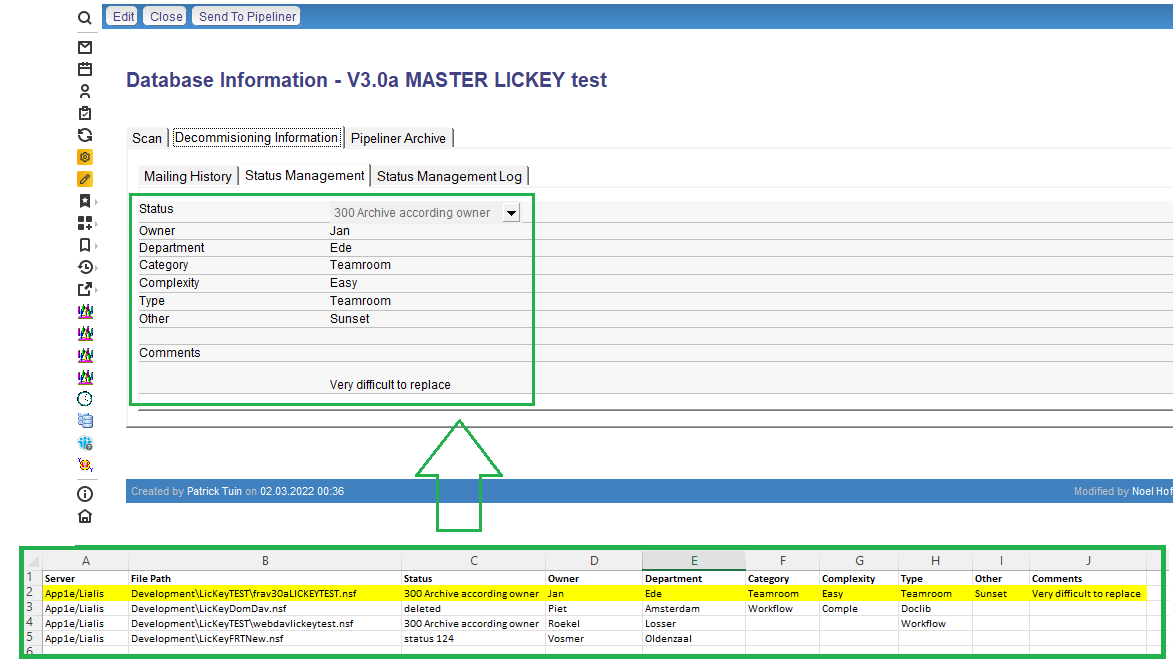
These imported values are also present in new the server-based CSV export that you may want to carry out later on.
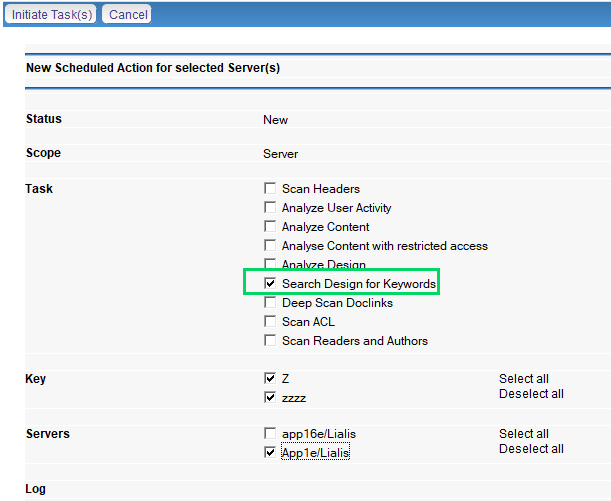
NDDM offers a way to find certain Notes database design strings. In this example we search for the design strings “@MailSend” and “.Send” to find out which Notes databases are sending out emails with for example workflow links that point to documents in other databases. Listing these Notes databases is important if you plan to do a Notes email migration first, since the database workflow will likely no longer be functioning.
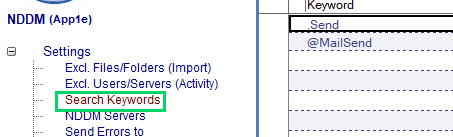
The strings to search for are defined in the ‘Settings\Search Keywords’ view.
You can schedule a design scan on all databases on one or more servers, or on a group of selected databases.

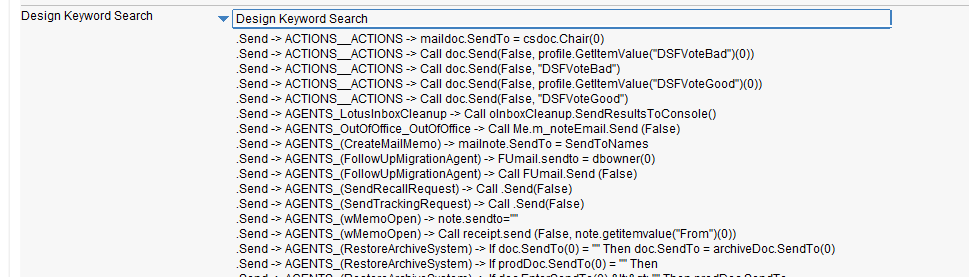
If a substring (case insensitive) is found in a design element, the complete line of code is returned as a result. An example of the found strings:
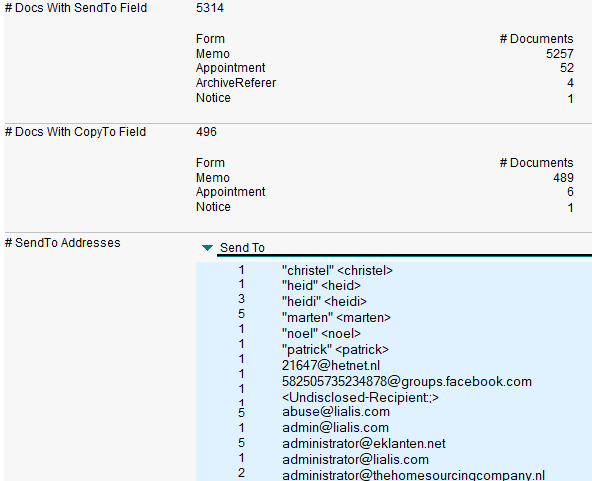
Another way to find out if a database is sending mail, comes from the content scan: if documents are found containing a SendTo and/or CopyTo field, the addresses in these fields are listed on the Database Info document. Note that this listing is up to a max number of characters. Rather than obtaining a complete list of email addresses, the goal is to get an impression of how important the mail functionality is for this application.
When you combine all this information, you get a relatively good insight in the mail functionality and whether it is still in use. Here is an example how to combine this information:
This Notes database holds 4 forms with people in the SendTo / CopyTo field. Nearly all documents were created with the Memo form.
The last time a Memo form was used, was in September 2021:

The ‘Database Design strings found’ view displays a selection of the Notes winner databases where the design strings (.Send & @MailSend) were found. Also the number of email addresses found in SendTo and CopyTo fields is displayed in this view:

Note: this view only displays database info documents where ‘Scan design on keywords’ ran on and where this scan returned results.
NDDM offers a deep Notes document link scan. Normally, you would only run this on Notes databases with the target ‘Replace Winners’.
Go to the ‘Targetting\Replace winners’ view, select all Notes databases and press the menu option ‘Schedule Analysis On Selected Databases’:
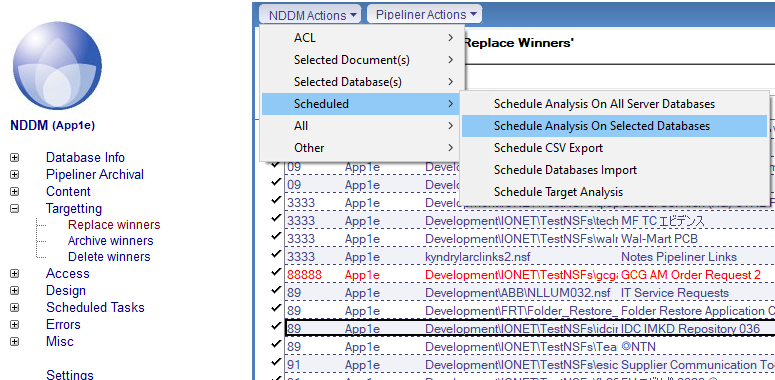
A server-scheduled task will now scan all document links found in each document in all databases. Each link will be tested whether it is a dead link or if it is pointing to an existing target. Note that for each server involved in this scan, a separate Task document is created.
The Scheduled Action document will show the current status of the scan task.
Each separate Database Info document shows the scan details under the ‘Log/Scan Log’ tab.

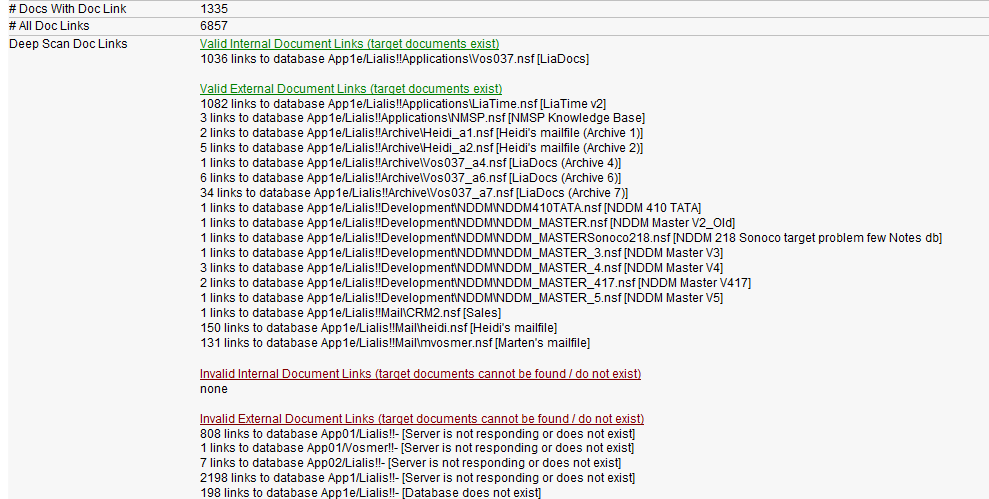
A result of the Deep Notes document link scan is displayed in the image below
NDDM offers a readers and authors field scan. Normally this scan is only carried out on Notes databases with the target Replace and Archive. For Notes databases with the target Delete, the scan results are not relevant.
The scan results are listed in the view ‘Reader & Author fields found’.

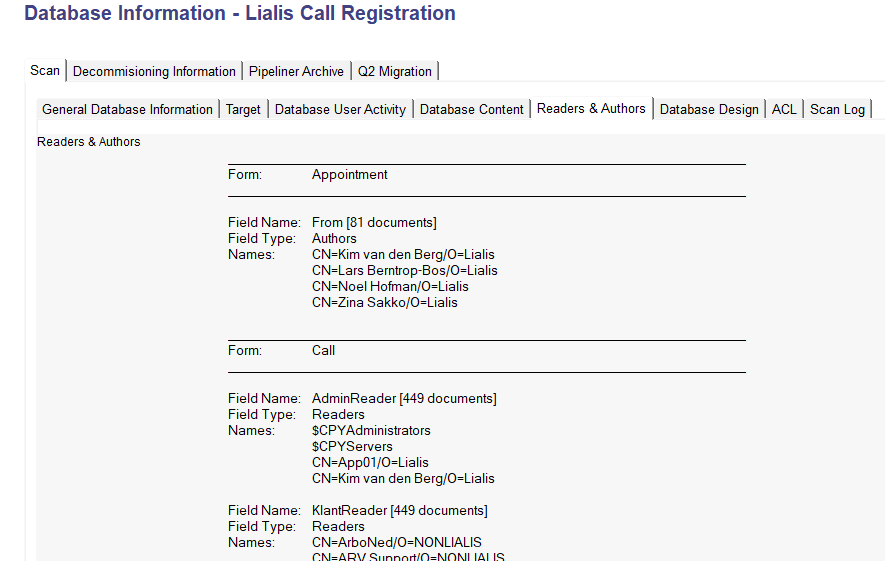
An example of the results is displayed below. Note that the names that are displayed per field, is a collection of all the names that were found on all documents created with the specific form.
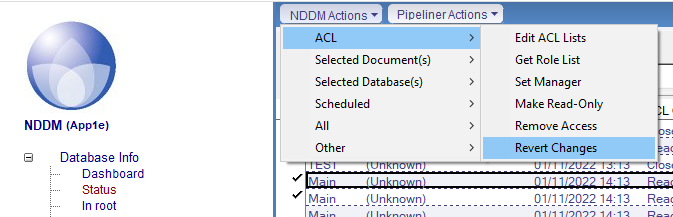
NDDM supplies great Notes database ACL adjustment functions that can be applied to multiple Notes databases in one go. It is easy to close the access for regular users for all Notes databases that have been targeted to 1400 Delete. If needed, this can be undone with one mouse click.
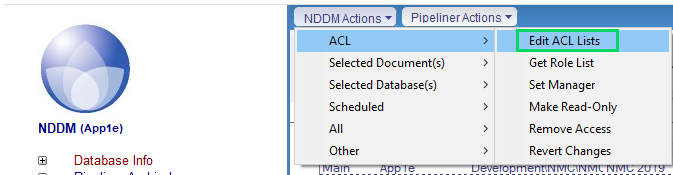
First, configure the ACL lists. The “Edit ACL Lists” function allows you to configure ACL entries to be added when the ACL is adjusted by NDDM. For example, always add the servers and admin groups.
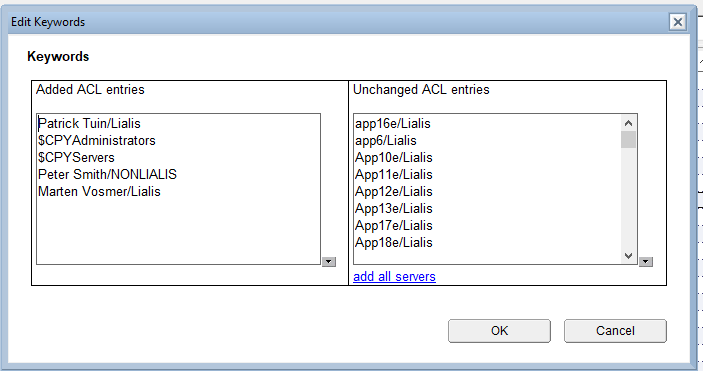
During the batch operation where NDDM is changing ACL’s on multiple databases, the entries listed under “Unchanged ACL entries” are not updated. Make sure to add the standard ACL Manager groups, server names and administrators to this list. Also include the members of groups that you add to the ACL. When a Notes database is ‘closed’, keeping these entries in tact ensures proper replication between Domino servers and Admin access later on.
NDDM will only change the ACL on 1 Notes database replica when multiple Notes database replicas are selected to be changed!!!!! This prevents ACL replication errors later on.
In the example below, the Administrator is going to set selected Notes databases with the target ‘2570 Delete’ to read only.

It is a good practice to set Notes databases with the target ‘2570 Delete’ to read-only first. By doing so, you give users a few weeks time to react, as they are not able to modify the content in Notes. Then you know whether or not the Delete classification should be adjusted.
The ‘Status’ view gives details on ACL closure status (other views will show this info as well)
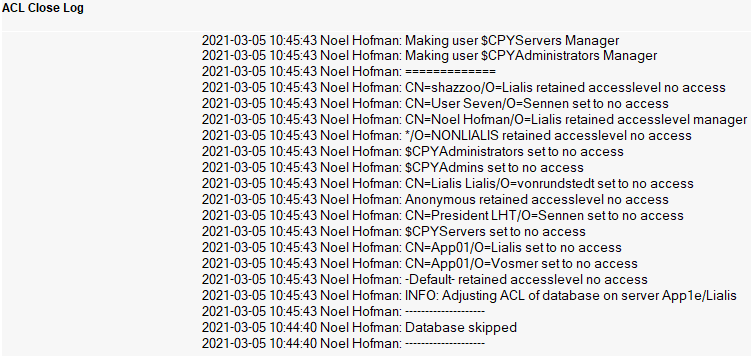
The NDDM database info document displays details on all ACL changes made with NDDM (tab ‘Decommissioning Information -> Status Management Log).
Changing back ACL changes made with NDDM is easy using the appropriate action menu:
Reverting access is logged as well.

The Notes database content scan will also identify the number of OLE objects listed in the Notes database documents.

![]()
NDDM allows admins to replace OLE objects with normal attachments, please see setting Pipeliner integration for details.
The Notes database content scan will also identify if the Notes database design is hidden.
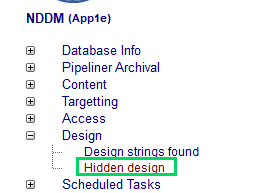
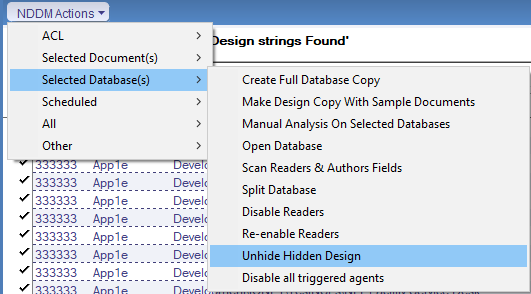
Select the Notes database(s) where you want to unhide the design and press this menu action.
When the targets are accurately applied, it is time to reach out to the users of the Notes database, for example to get confirmation of the calculated target.
You need to give the end users access to NDDM so they can answer the questions presented in the questionnaire. One way to do this is via an ACL wildcard as displayed in the image below.

With the above permissions, end users will not get any access to the content of NDDM because all content is protected with readers fields. The image below shows the NDDM user interface to end users who do not have the Admin role.

NDDM has a nice way to send (questionnaire) emails in batches, based on predefined templates and specific data from your scan.
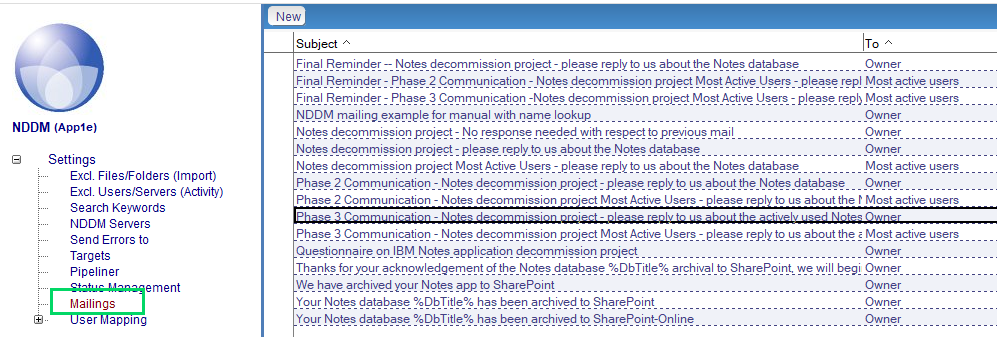
To configure a mailing, open the view ‘Settings -> Mailings’ and click the ‘New’ button (or edit/use an existing mailing template)
You may send the mailing to the following 5 groups of users.
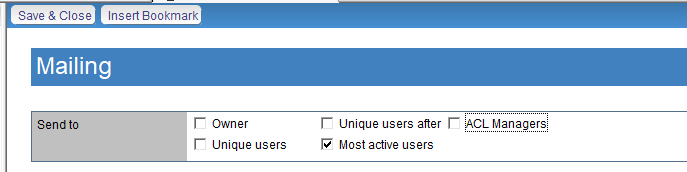
Owner is retrieved from this field in NDDM.
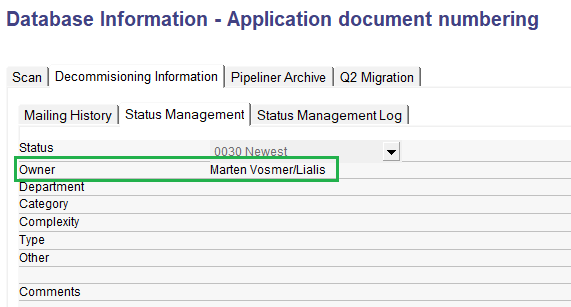
As mentioned in section “Import data into NDDM with Excel” you can import one or more owners names into NDDM. Just make sure to import complete Notes names, like Marten Vosmer/Lialis
ACL Managers is retrieved from this field in NDDM. All servers in this group are excluded from the mailing.
Unique users is retrieved from this field in NDDM.

Unique users after is retrieved from this field in NDDM.
Most active users is retrieved from this field in NDDM.

To start the communication we suggest to use ‘Most active users’ option to begin with.
The Subject and Body of the email can be set.
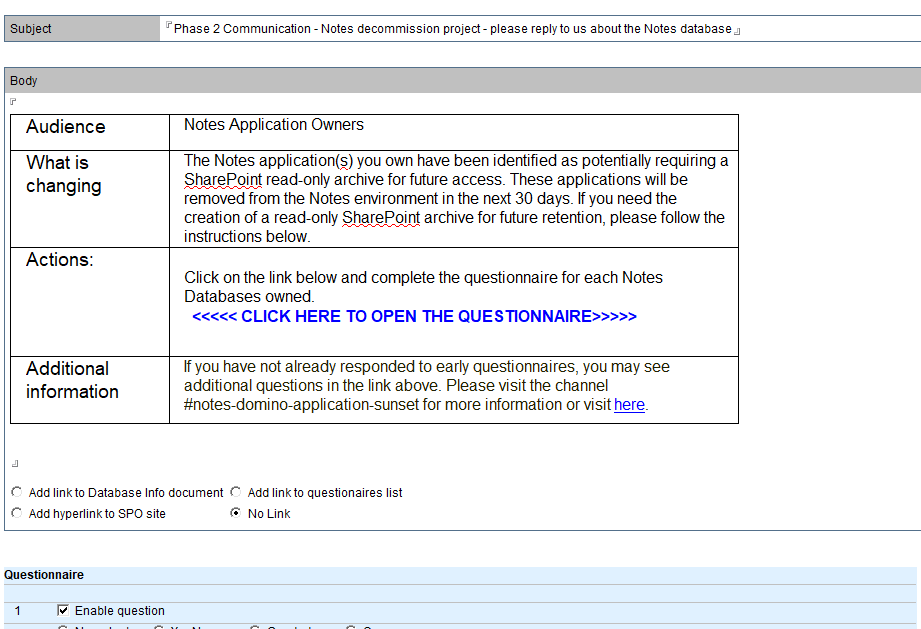
The 4 questionnaire options at the bottom of the body are important.
1. Add link to Database Info Document – this option will send the user an email with a Notes document link to the NDDM document where the questionnaire can be answered. You may use this method if an end users will receive only a few emails in which he is requested to answer the questionnaire.
The ‘Insert Bookmark’ actions (for example %DbAllDocLinks%) are supported in this option. Note that these actions do only work for questionnaire option “Add link to Database Info document”.
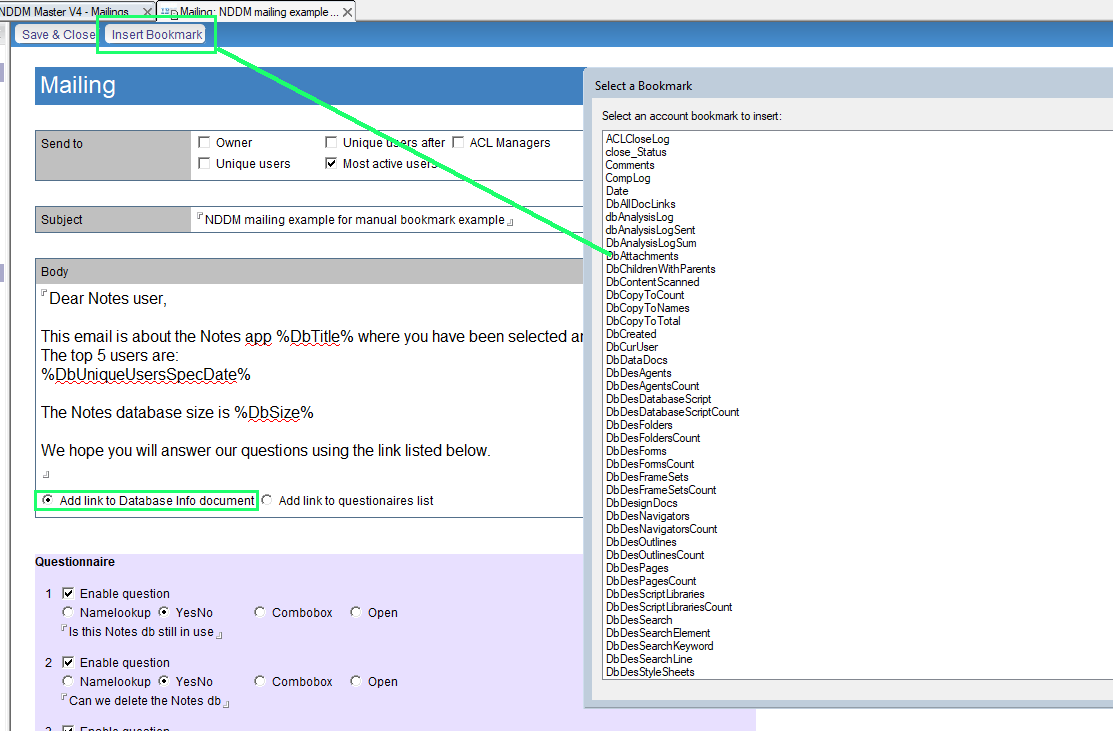
The email sent to the user will contain a document link at the bottom that directly points to the NDDM document and questionnaire.
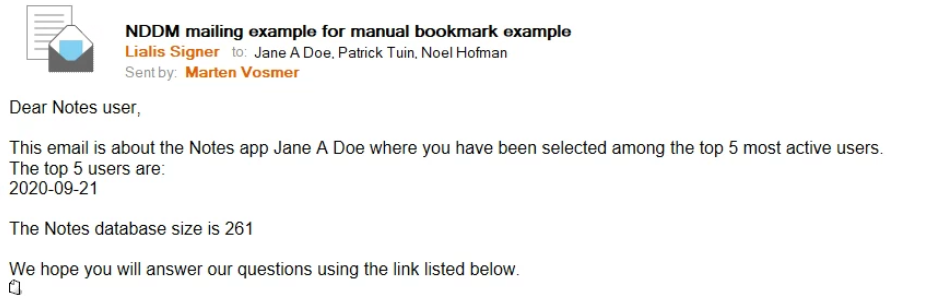
You can see that the bookmarked variables are filled with the actual values from the NDDM scan (although inappropriately selected).
2. Add link to questionnaires list – this option will send the user a link to the NDDM Questionaires view where the user can view all NDDM questionnaires directed to him. You may use this method for users that will receive multiple Notes database questionnaires in NDDM. The ‘Insert Bookmark’ options (for example %DbAllDocLinks%) are NOT supported.
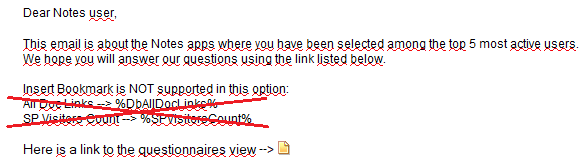
The user will receive only 1 email, even if the user is listed as owner for 10 Notes databases.
The questionnaires view is displayed below. In this example, it only lists 1 questionnaire.

The user may open the questionnaires 1 by 1 and answer the questions. The view will display what questions have been answered.

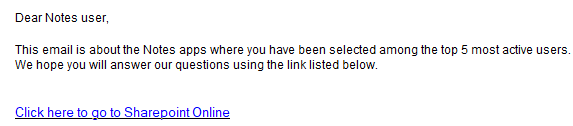
3. Add hyperlink to SPO site – this option will add a link to the SharePoint Online site where the Notes database has been archive to. The topic ‘Archiving with Pipeliner integration’ is explained later in this document.
4. No Link – no link is appended to the email. You may use this option if you manage the link yourself in the email body. This option can be used if users are addressed for multiple Notes databases, so that they will receive only 1 email from NDDM.
Questionnaire
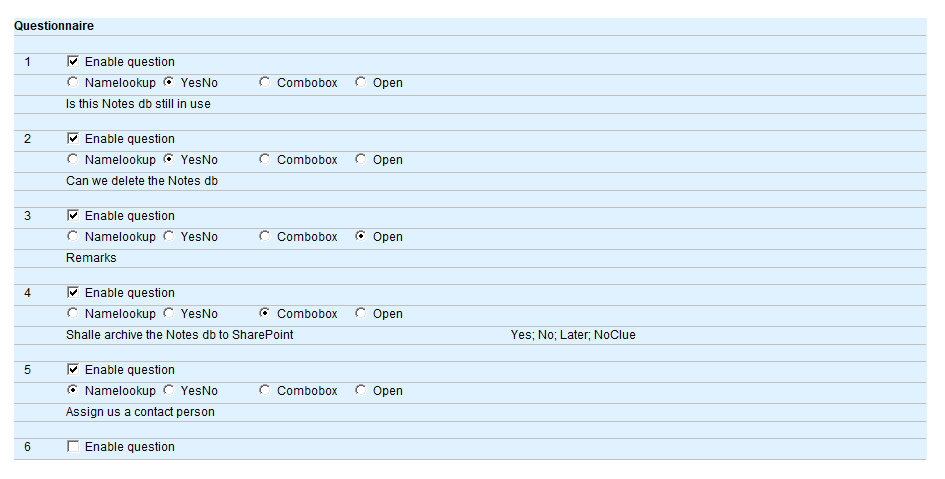
You may configure up to 10 questions in the questionnaire. Question examples are displayed in the image below.
Before you send out emails, please review the Status Management settings list. After sending an email, NDDM will prompt you to choose one of these status values for the Notes database where you have send a questionnaire to. To keep track of actions to be performed on each Notes database, it is crucial that you manage the exact status of each Notes database very well.

Example: to send a mailing to all Notes databases with the target Archive, do the following:
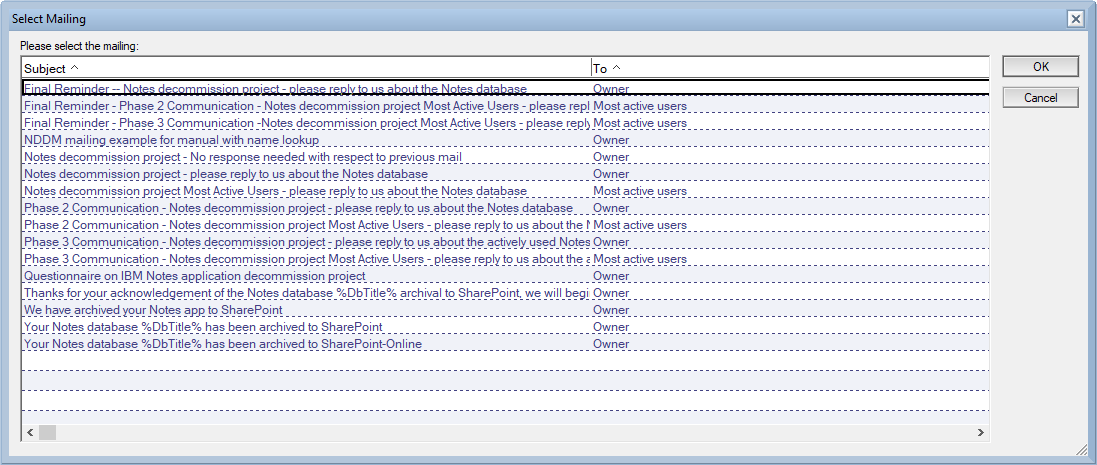
- Form the view ‘Archive winners’, select the Notes databases you want to use for your mailing. Then press the ‘Send mailing’ action to choose the email template.
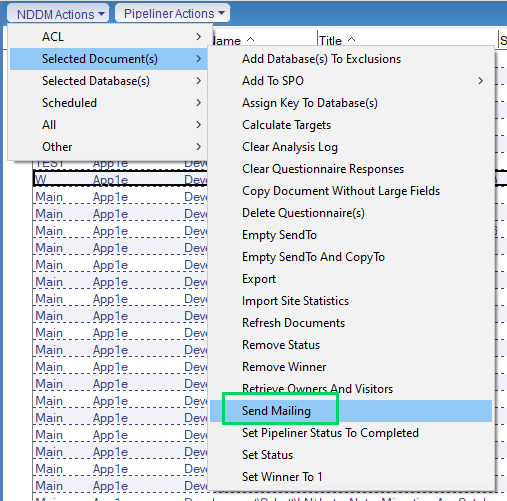
- Select the correct Mailing template and press OK
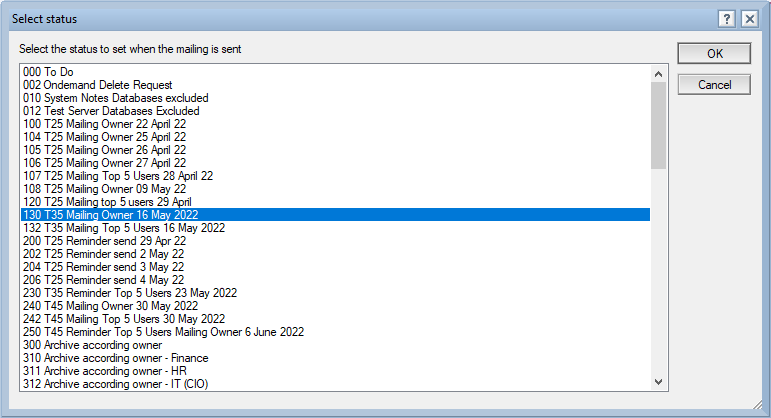
- You will be prompted to choose a status value for these Notes databases. Select the correct one and press OK
In the ‘New / In Progress’ tasks list, you will see a new task document. The Domino server will take care of sending the email and set the status accordingly.
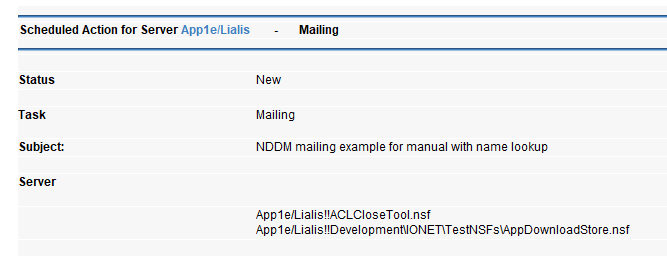
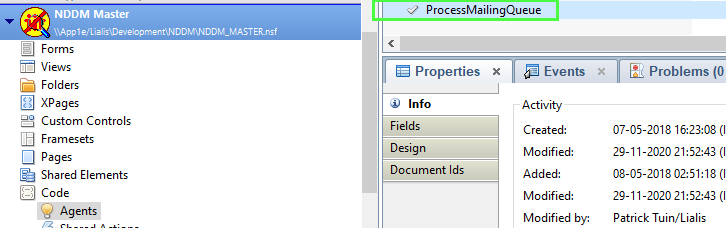
A scheduled agent called ‘ProcessMailingQueue’ will pick up and send these emails. If you are going to use the NDDM mailing features, you need to configure this agent. To do so, open NDDM in the Notes designer and open this agent:
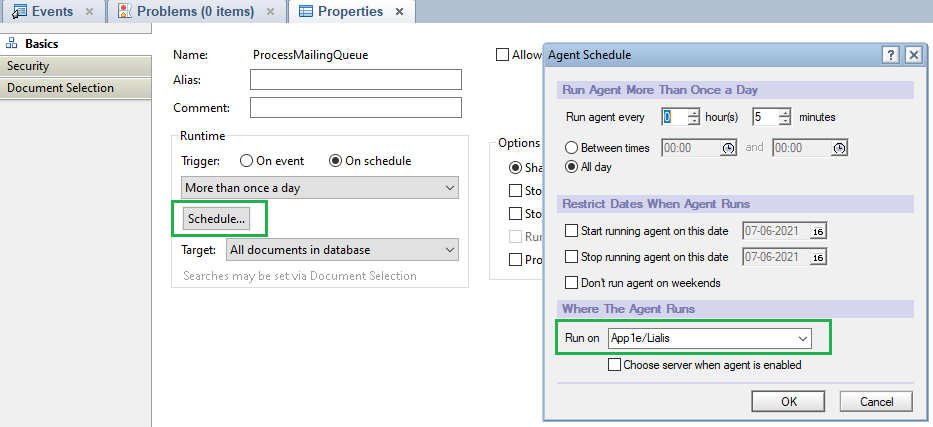
Set the Domino server which will run this agent to send out the emails, for example a central Domino HUB server.
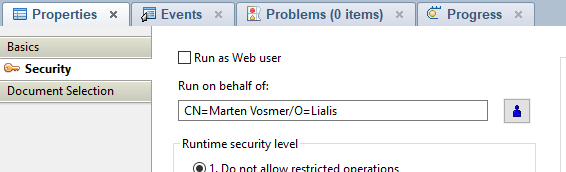
Determine which user will be the sender of the email. Set this username here and save the agent under this user’s Notes ID:
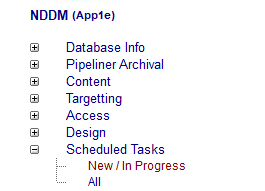
When the mailing task has been completed it will be visible in the view ‘Scheduled Tasks -> All’
All questionaries sent out are displayed in the view ‘Database Info -> Questionnaires’
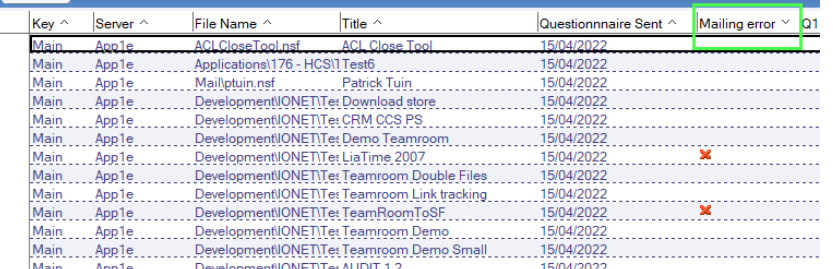
Please pay attention to the red cross in the Mailing error column, the email was not send properly, so the intended users have not received the email.
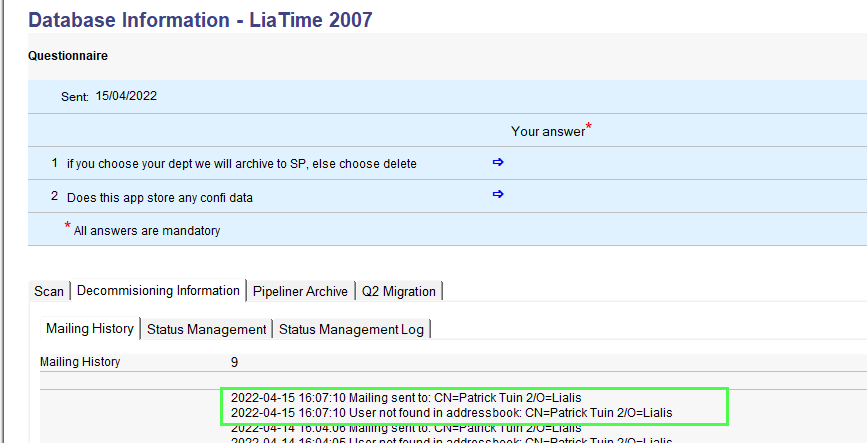
The NDDM database info document displayed above, shows the mailing details, like how many emails where sent for this Notes database record (Mailing History).
In the Questionnaires view, the administrator can see the questionnaires that were sent out, and the responses from the end users:

You can clear previous answers on questionnaires by using the “Clear questionnaire responses” action. You may do this if you want other people to answer the questions again.
Or you can remove all questionnaire fields from the NDDM database info document using “Delete questionnaire ” action. You may use this option if you want to send out a new questionnaire with modified questions.

NDDM is mainly used in environments where the email has already been migrated, for example to Outlook. Getting this NDDM mailing feature to work smoothly in hybrid email domains may be challenging. But no worries, Lialis will assist you in setting this up.
Please note that sent messages are NOT saved in NDDM.
This scan will report the users and their access level to the Notes database. If groups are found in the Notes database ACL, the members of these groups will be collected from the Domino Directory.
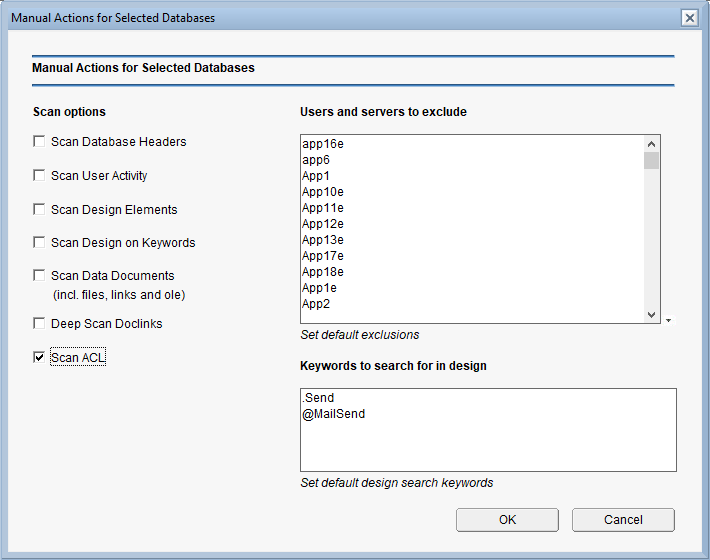
Just like the database content scan, the ACL scan can be done manual on the client, or server-based via a scheduled agent. For example, you can select the Notes databases you want to scan and press
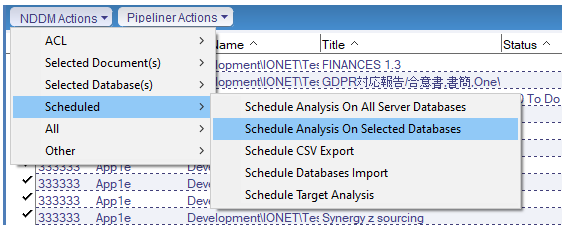
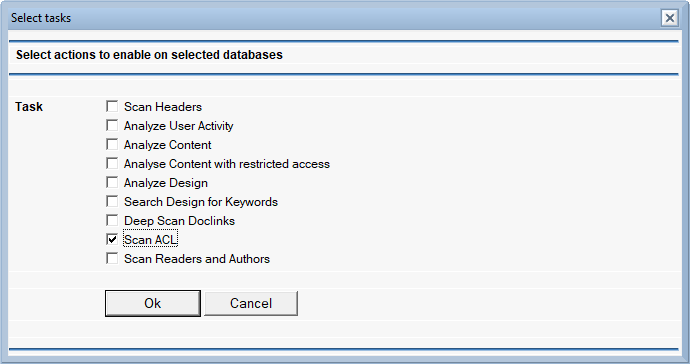
Select the ‘Scan ACL’ check box and then press ‘Initialize Task(s).


The task is created for the NDDM agent to pick up.
If you don’t want to wait for the agent, you can also scan the selected databases manually, but this Notes client-based scan will run much slower.
A result example is displayed in the image below. Note that in this case, groups contained the Common Names of users. Normally, the abbreviated name is logged.
When a user name is found in multiple groups with different access, the user name is registered to the ACL level that corresponds to the ‘actual access’ of the user.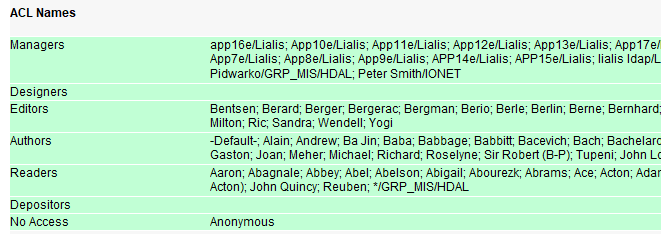
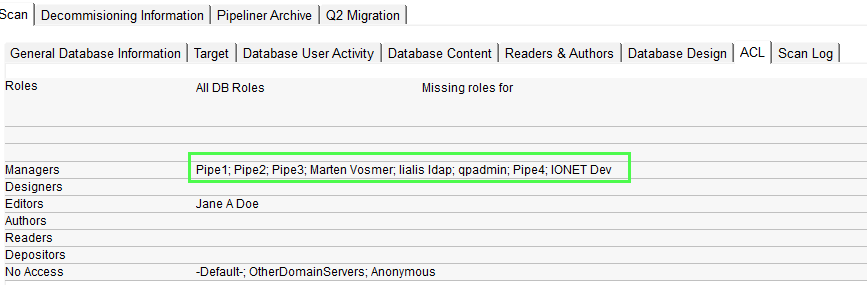
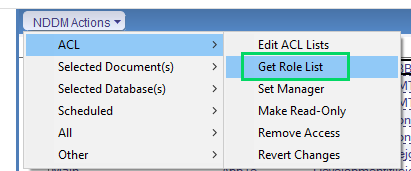
Another function of NDDM is the ACL role scanner. This scanner reports the roles that the user, current pressing the ‘Get Role List’ action, is missing in certain Notes databases.
This feature is very helpful to fix issues related to a server-based scan showing incomplete scan results, due to Notes document readers limitations.
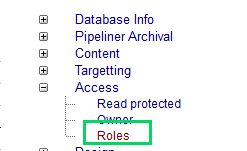
Open view “Database Roles”. Select all documents in this view, or only select the Notes database you are interested in.
Then press the action “Get Role List”
The Notes client background agent will report the roles that are specified in the ACL, and which of these roles the current user (Administrator) is missing.
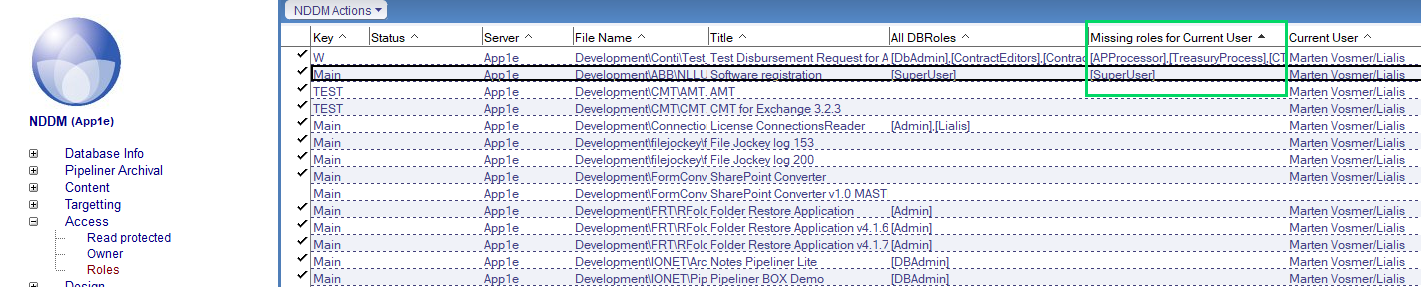
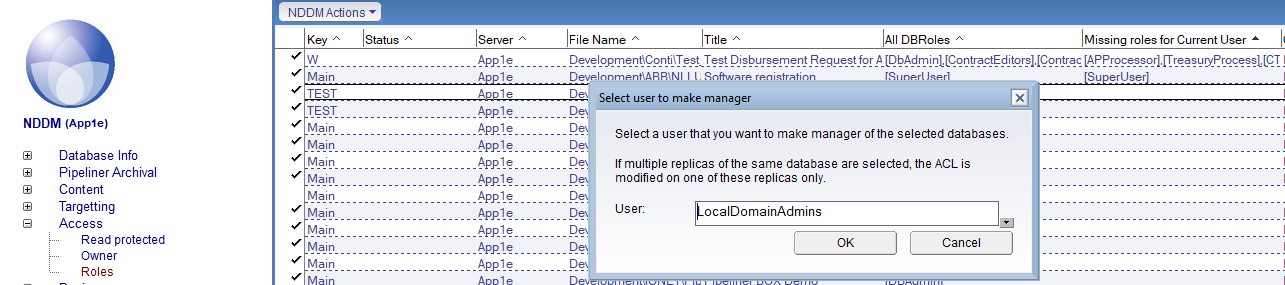
When the agent has finished, sort the column “Missing roles for Current User”. Select the Notes databases where the Administrator is missing ACL roles and press the ‘Set Manager’ action. Select the Administrator (or the containing group) and press ‘OK’ to add the Administrator to the Notes database ACLs. It will assign all roles to this user.
When you then rescan these Notes databases, the column “Missing roles for Current User” will show no roles. This means the Administrator has all roles assigned.